webpack for real tasks: bundling front-end and adding compilation

This is the first part of a three-part introduction into webpack:

  1. Bundling front-end and adding compilation (you are here!)
  2. Decreasing front-end size and improving caching
  3. Speeding up build and improving the development workflow

Want to stay tuned for the future posts? Subscribe

What is webpack#

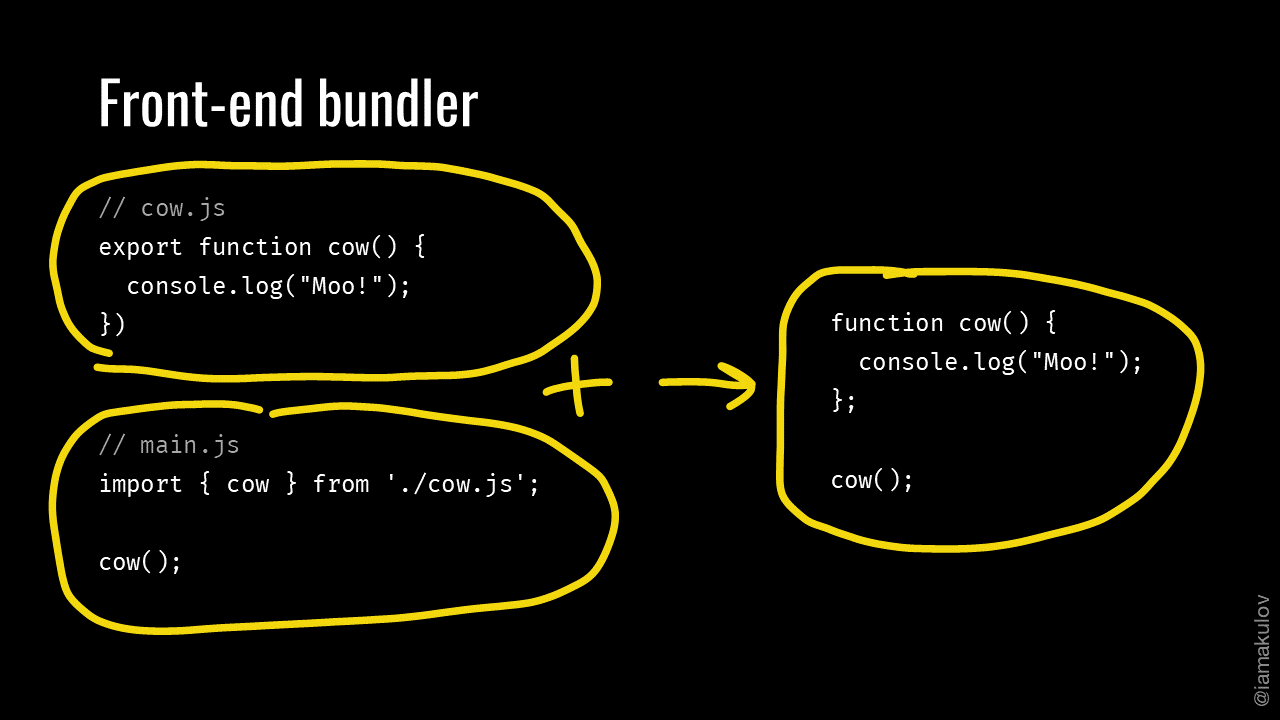
Webpack is a front-end bundler. And a front-end bundler is a tool that combines multiple modules into a single file called bundle:

While the main purpose of webpack is bundling, it also has a lot of other abilities. For example, webpack can compile your front-end, split your code into multiple files or optimize your bundle size. I’m reviewing many of these abilities in this series of posts.

If you’re not familiar with the concept of bundling, Preethi Kasireddy wrote a good introduction to it. Check it out and come back!

Task Bundle front-end#

Given: you have an application that consists of lots of modules. Like Cut the Rope:

You want to bundle the modules into a single file: to speed up the loading of an app*, or to serve a library as a single module, or for another reason. Let’s see how webpack can help with this.

* – if you’re thinking “Wait, HTTP/2 made bundling unnecessary”, see the Khan Academy’s post about why no bundling is a bad idea

// comments.js
define(['./dist/lodash.js'], (_) => {
  // …
  return { … };
});

// index.js
define(['./comments', …], (comments, …) => {
  // …
  comments.render(commentsData, '#comments');
});

If your code uses AMD, CommonJS or ES modules, everything is simple. Webpack supports these module systems out of the box, so to compile a project with them, you’ll only need to specify the entry file and the name of the resulting file.

To do this, create a file called webpack.config.js in the root of your project with the content like this:

// webpack.config.js
module.exports = {
  // An entry point. It’s the main module of your application
  // that references all the other modules
  entry: './src/index.js',

  output: {
    // The directory where the bundle should be placed
    path: './dist',
    // The name of the resulting bundle
    filename: 'bundle.js',
  },
};

Then, run webpack:

npm install --global webpack
cd your/project/directory
webpack

Once you launch webpack, it will compile your project and generate a bundle with all your JavaScript. What’s left? Replace the import of your old entry file with the name of the new file:

// index.html
<!doctype html>
<body>
  <!-- … -->
- <script src="./src/index.js"></script>
+ <script src="./dist/bundle.js"></script>
</body>

Task solved.

Bonus point: all module types at once#

Webpack supports all three module types in the same project simultaneously. So if a part of your code is in AMD and the other part is in ES modules, it will just work. This can be helpful if you decide to gradually migrate from one module format to another.

Bad case: your code uses your own module system#

// comments.js
MyApp.define(['./dist/lodash.js'], (_) => {
  // …
  return { … };
});

// index.js
MyApp.define(['./comments', …], (comments, …) => {
  // …
  comments.render(commentsData, '#comments');
});

In case your code uses a module system different from AMD, CommonJS or ES modules, things get more complicated. To make webpack work with your code:

  • either migrate your code to a supported module format. Facebook has a tool called codemod which can automate a massive refactoring and could be useful for you;

  • or write a Babel plugin for converting your custom module format to AMD, CommonJS or ES modules. This plugin will be executed on each compilation. Take a look at babel-plugin-transform-amd-to-commonjs to get an idea of how to write it. (We’ll see how to enable Babel a bit later.)

After you deal with the custom module format, configure the entry point and the output as described in “Good case” above.

Bonus point: global webpack installation#

Although installing webpack globally (npm install –global webpack) is the easiest way to do the build, I prefer using it through npm scripts. webpack is often installed as a project dependency (because it provides plugins that are used in the configuration), so using it from npm scripts prevents the version conflict. Also, npm scripts can be run from any directory inside the project, not only from the root:

// package.json
{
  "scripts": {
    "build": "webpack"
  }
}
# Console
npm run build

Task Compile JavaScript#

Given: you have some code that cannot be run in the browser. This can be code that uses features from the next JavaScript standard or even code in another language like TypeScript:

// comments.js
import _ from 'lodash';

export async render(…) {
  const userData = await getUserData(userId);
  // …
}

You want to compile it to make it work. Let’s see how webpack helps to solve this task.

Assume you’re using Babel. You may have used it from the command line specifying the input and the output:

babel ./src -d ./dist

Or you may have used it from Gulp as a part of a stream:

gulp.task('default', () => {
  return gulp.src('./src/**/*.js')
    .pipe(babel())
    .pipe(gulp.dest('dist'));
});

webpack has a bit different approach. It uses loaders.

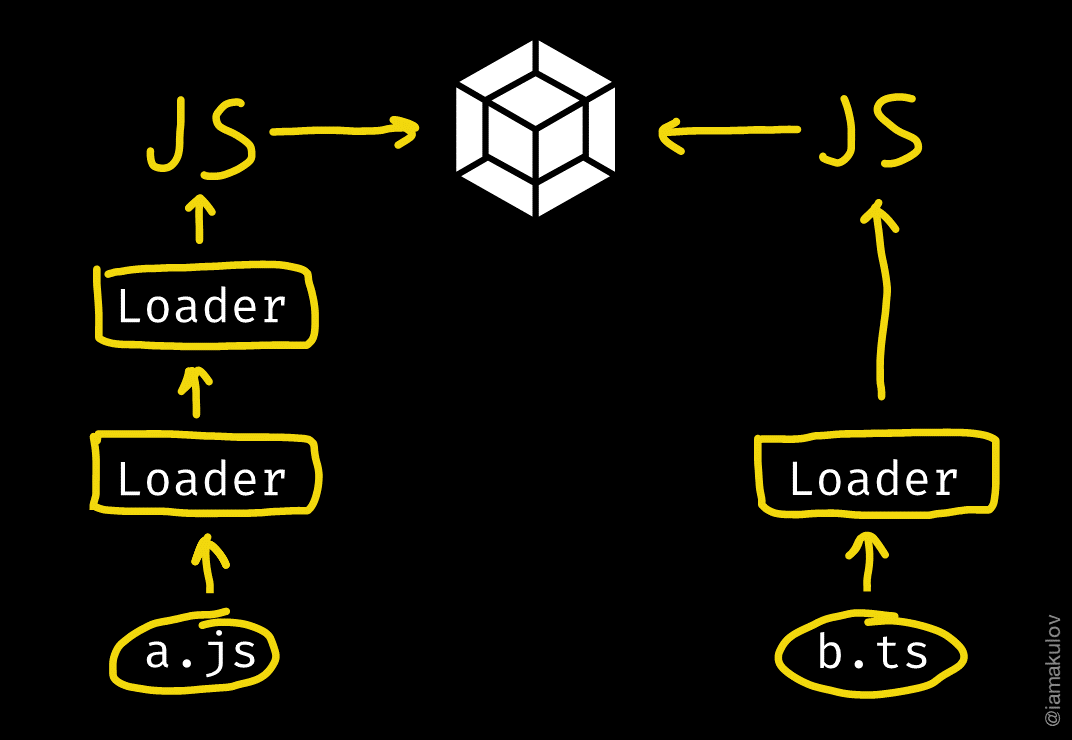
A loader is a JavaScript module. Webpack pipes all files through specified loaders before adding them into bundle.

A loader accepts any input and converts it to JavaScript which webpack works with. Loaders can be organized into chains; a chain accepts any input, pipes it through the loaders and passes the result to webpack. In this case, intermediate loaders can return anything, not only JavaScript.

In webpack, Babel works as a loader. To use it, install babel-loader with its peer dependencies. Then, tell webpack to apply the loader with the module.rules option:

// webpack.config.js
module.exports = {
  // ...
  module: {
    rules: [
      {
        // Take every JavaScript file imported into a bundle...
        test: /.js$/,
        // ...and pipe it through babel-loader...
        use: ['babel-loader'],
        // ...with the following options
        options: {
          presets: ['env'],
        },
      },
    ],
  },
};

The same approach works for TypeScript:

// webpack.config.js
module.exports = {
  // ...
  module: {
    rules: [
      {
        test: /.ts$/,
        use: ['ts-loader']
      }
    ]
  }
};

Or you can chain Babel and Typescript to do transformations that aren’t supported by the latter:

// webpack.config.js
module.exports = {
  // ...
  module: {
    rules: [
      {
        test: /.ts$/,
        // Loaders are applied from right to left
        use: ['ts-loader', 'babel-loader']
      }
    ]
  }
};

You can find the list of the most popular loaders in webpack docs.

Bonus point: different ways to specify a loader#

Above, I passed a string array into the use property to apply a loader. There’re two more ways to specify loaders. Here’re all of them:

// Specifies a single loader with or without options
{
  test: /.js$/,
  loader: 'babel-loader',
  options: { ... } 
},

// Specifies multiple loaders without options
{
  test: /.ts$/,
  use: ['ts-loader', 'babel-loader']
},

// Specifies multiple loaders with or without options
{
  test: /.ts$/,
  use: ['ts-loader', { loader: 'babel-loader', options: { ... } }]
}

Choose between them based on your needs.

Bonus point: loaders in the require query#

Apart from specifying loaders in webpack.config.js, you can also specify them in your import request:

import comments from 'ts-loader!babel-loader?presets[]=env!./comments.ts';

This can be useful for testing. Nevertheless, I don’t recommend using it in production because it makes your code dependent on a specific bundler.

Task Manage other files#

Webpack can also help you manage your styles, images or any other files.

Given: front-end application with styles and other assets.
You want to manage them with webpack to reduce the number of the necessary tools. Let’s see how to do this.

The one important thing you should remember here is the following:

In webpack, every asset is imported as a module

That is. In a traditional task manager like Gulp you split your front-end compilation by a file type:

// gulpfile.js
gulp.task('js', function () {
  return gulp.src('./src/index.js')
    // ...
    .pipe(gulp.dest('./dist/'));
});

gulp.task('css', function () {
  return gulp.src('./src/**/*.scss')
    // ...
    .pipe(gulp.dest('./dist/'));
});

In webpack, however, you don’t split the compilation. You treat the front-end as a whole single thing. To include styles and other assets, you import them:

// comments.js
import _ from 'lodash';
import './comments.scss'; * ← Here
import iconUrl from './commentsIcon.svg'; * ← And here

export function render() {
  // ...
}

and apply specific loaders to teach webpack to handle these imports. Imported files either get inlined into the bundle or placed next to it. This depends on the loader you use.

Let’s see how to use this in practice.

Q: For the mother of god, why?#

A: I don’t know why it was decided like this in the beginning. Nevertheless, this brings a real benefit. Usually, with webpack, you import all files used by a component straight into its main JS file. Because of this, all these files will be included into your bundle only if you actually use the component in your app.

Styles#

Here’s the most basic approach:

// comments.js
// Import the file to pass it under webpack’s management
import './comments.css';

// webpack.config.js
module.exports = {
  // ...
  module: {
    rules: [
      // Configure webpack to pass all .css files through css-loader and style-loader
      // (remember that loaders are applied from right to left)
      { test: /.css$/, use: ['style-loader', 'css-loader'] },
    ],
  },
};

Here’s what the loaders do:

  • css-loader reads the CSS file, passes all @import and url() in that file through webpack and returns the result,
  • style-loader gets the passed CSS content and creates code that will append that CSS to <head> when the bundle gets loaded.

If you need to compile your styles with a preprocessor, append a corresponding loader into the loaders list and pass the importLoaders = 1 option to css-loader:

// webpack.config.js
module.exports = {
  // ...
  module: {
    rules: [
      { test: /.css$/, use: [
        'style-loader',
        { loader: 'css-loader', options: { importLoaders: 1 } },
        'sass-loader',
      ] },
    ],
  },
};

See: postcss-loader, sass-loader, less-loader.

Bonus point: CSS Modules#

In the examples above, styles don’t provide any exports and therefore are just imported. However, there’s no technical limitation to provide exports, so there are approaches that do this. One of them is CSS Modules.
With CSS Modules, importing a stylesheet returns a JavaScript object with class names specified in the file. These class names are converted to be unique, so you can use a class name like .button in several components without any collision:

/* button.css */
.button { /* styles for the normal state */ }
.disabledButton { /* styles for the disabled state */ }
.errorButton { /* styles for the error state */ }
// button.js
import styles from './button.css';

buttonElement.outerHTML = `<button class=${styles.button}>Submit</button>`;

CSS Modules are enabled by passing the modules = true option to css-loader. Read more in the CSS Modules introduction.

Other files#

All the other files are also managed using loaders. Approach for every file type is different, so find the appropriate loader and look into its docs. See the list of the most popular loaders.

Here’re examples of loaders for different file types:

  • svg-url-loader:

    import iconDataUrl from './icon.svg';
    // => iconDataUrl contains a data url of the icon
    
  • pug-loader:

    import template from './template.pug';
    // => template is a function that returns
    // the rendered HTML
    
  • file-loader:

    import documentUrl from './document.pdf';
    // => document.pdf is emitted next to the bundle;
    // documentUrl is its public URL
    

Σ#

The key points:

  • The minimal config of webpack is just the entry point and the output file. Webpack works with AMD, CommonJS and ES modules out of the box
  • You can use loaders to compile your JavaScript and manage other front-end files

  • Every file is imported as a module

See the second part, “Decreasing front-end size and improving caching”


The third part of the guide, “Speeding up build and improving the development workflow”, is coming soon. Leave your email to know when it’s out:
(you’ll receive an email about the next part of the guide + a couple of more webpack-related posts if I write them; no spam)

Thanks to Artem Sapegin for reviewing this post

Redux vs React’s setState()

Sometimes you can get into a situation when you’re choosing between Redux and React’s setState(). When I’m doing such choice, I often use the following rule of thumb.

Imagine that your app can restore its state when you refresh the page.

Use Redux if you’d prefer to restore this specific piece of state.
Use setState() if don’t have this need

Basically, this is about the importance of a piece of state. Is it important enough to keep it across refreshes? If yes, use Redux. If no, setState() would do the job just fine.

Here’s how I’d make the choise:

Redux setState()
The selected value in a dropdown on a page The open/closed state of a dropdown
The current page of a book in a book reader app The visibility of toolbars in the app
The current level in Angry Birds The state of birds and pigs in the current level in Angry Birds

For me, the state in the left column is important, and the state in the right column is not. Your app can require a different decision.

This criterion is not universal – i.e. sometimes you might need to put the “dropdown is open” state into the store because you change another component’s styles based on this. But for me, it works in most cases.


Posting this on Reddit triggered a great comment:

Redux = data grabbing and global state that’s shared across more than one component.
setState = silo’ed state that is isolated from other components.
jiblet84

Yes! Another (and probably more common, as I’m realizing after receiving the feedback) criterion for choosing between Redux and setState() is how global the state is. So here’s another approach:

Use Redux if your state is shared across multiple components. Use setState() if it’s used only in a single component.

Exclusive code ownership (why it’s bad and what to do with it)

In December 2016, a front-end developer left a team where I work. Apart from other changes, this created an issue. When he was working, the project had a couple of complex modules we were developing with him together. When he left, I realized that only I am able to work with them – other two team members knew nothing about how these modules function. This is called “exclusive code ownership”, and it’s bad in the long term, so I had to start fixing this. Here’s why it’s bad and what to do with it.

🖐 🔮

Problems#

Bus factor#

Imagine there’s a complex module in your project that only you work with, and you’re hit by a bus tomorrow. Will the team be able to continue developing this module the next day? Most likely no. This means the bus factor of your team is 1 – that is, it’s enough to kill remove a single developer from the project to severely slow or even stop its development.

Until recently, our project has been heavily relying on a custom front-end framework that was developed by only a single team member. No other developers knew its inner parts, and only a couple of them knew it deep enough. This meant the bus factor of the whole front-end team was just one. This, along with other issues, led us to migrate from this custom framework to React in 2016.

Bottlenecks#

If there’s a module in the project that you exclusively own, then, regardless of the team size, only you will be able to make changes in it. If tomorrow you receive 5 critical issues related to this part, there’ll be nobody to help you. You may even slow down your team if these critical issues block them.

We had this problem when a part of our front-end infrastructure changed, and this broke builds for the whole team. Because it was only me who knew how all this stuff works, I had to fix the problems one-by-one. If other team members knew this, they could’ve helped me bring everything back sooner.

Leaving is hard#

If once you decide to leave the project, you’ll have to transfer all your unique knowledge about how these parts work to other team members. Depending on the knowledge size, this can take significant time, and it still will be less effective than if other members had real experience with the code.

You create risk and slow down delivery

What to do#

Documentation and maintainability#

You have probably heard this advice for a lot of times, but it’s never bad to repeat it again. Make your code documented and maintainable. This includes code cleanliness, inline comments, and external documentation.

It’s your choice how much to document the code. I usually try to make it self-documenting and add comments only if the purpose of the code or the decisions behind it are still unclear. Also, remember that self-documenting code is better than comments, and comments are better than external documentation. People occasionally forget to update the comments and often forget to update the external documentation, so the only up-to-date source of information is code.

Commit messages#

In my experience, writing detailed commit messages is very underestimated. I’m sure that one of the best ways to share your code knowledge is to include it into your commits. Once you commit something, it stays in the history forever, and tools like git blame help you to easily find which commit changed the specific lines. This means that even if you leave the project, the other developer that will work with the piece you’ve written will be able to git blame the code and see why you made this or that change.

What to write in a good commit message? Well, this is one of the examples from my project I like (I wrote this so I like it, pretty obvious):

Look, this commit includes:

  • the issue number (so that another developer could go and see the business requirements behind the change),

  • the short description of the change (which is usual),

  • and the longer text that explains the commit.

The last part is exactly where you put your code knowledge. Answer why you did the changes. Explain the background that could be unclear to another developer in the half of the year. Document the limitations that your solution has and the issues it creates (if any). Include everything else that you consider significant.

Follow to this Caleb Thompson’s article if you want to read more about good commit messages (especially, take a look at point 4). Also, kudos to Andrey Listochkin for giving the advice about this in one of his talks.

Processes#

If you’re a team lead, and you realize that you have this problem in your team, you can use your power to change this:

  1. Find what modules are exclusively owned by someone.
  2. Find what tasks you can give to other team members so that they get experience with these modules.
  3. Ask the module owner to introduce developers that will work with the tasks into the module code.

If you’re a regular developer, and you realize your team has this problem, talk with your team lead. Feel free to show them this article.

Also, this should be solved by introducing mandatory code review or pair programming, though we haven’t practiced this ourselves.

Docs, commit messages, processes

#

So, well, the checklist:

  • Write self-documenting code

  • Use comments when it’s necessary

  • Write good commit messages answering “why”, not only “what”

  • Involve other team members into working with the code

Follow me on Twitter: @iamakulov

How to install Google Chrome on Travis (in a container-based environment)

Updated 22 Jan 2017: removed the “addons.apt.sources” because looks like the google-chrome source is now provided by default.

Here’s the code. Scroll down for more details:

dist: trusty
sudo: false

addons:
  apt:
    packages:
      - google-chrome-stable

before_script:
  - export DISPLAY=:99.0
  - sh -e /etc/init.d/xvfb start &
  - sleep 3

What’s this#

Travis CI is a popular continuous integration tool. It can be used to run tests when the project code changes, automatically publish changes to the repository, etc., etc. With this config, we configure Travis to install Chrome for each execution. This can be used for e.g. automated UI testing.

Container-based infrastructure#

Since the beginning of November 2016, you can run Ubuntu 14.04 on Travis CI in a container-based environment. A container-based environment is cool because it noticeably speeds up builds, has more resources and more. The drawback is that you can’t use sudo, but Travis has replacements for some common use-cases.

What does this do with Chrome? Chrome can’t be installed on Ubuntu 12.04 which just recently was the only available container-based environment. If you were doing UI testing, you either had to use Firefox (geckodriver) which was buggy as hell or had to accept much longer build times. ¯\_(ツ)_/¯

This config does enable the container-based infrastructure.

What does the code mean#

sudo: false
dist: trusty

sudo: false switches the environment into the container-based mode (and disables sudo). dist: trusty switches the distribution to Ubuntu 14.04 (the default one is 12.04). Here’re the other field values if you need them: https://docs.travis-ci.com/user/ci-environment/

addons:
  apt:
    packages:
      - google-chrome-stable

This installs Chrome. Travis provides the apt addon which is a handy way to install necessary packages. (Also, it’s the only way possible in the container-based infrastructure.)

The packages part of the addon specifies to install the google-chrome-stable package. This package gets installed from the official Google Chrome source which seems to be enabled in Travis by default.

Here’re the docs for the apt addon: https://docs.travis-ci.com/user/installing-dependencies/#Installing-Packages-with-the-APT-Addon

before_script:
  - export DISPLAY=:99.0
  - sh -e /etc/init.d/xvfb start &
  - sleep 3

This starts xvfb (X Virtual Framebuffer) that imitates the display and makes Chrome think it’s run in a GUI environment. sleep: 3 is required to give xvfb time to start (this is what Travis recommends to do). If you need to set the screen resolution or the pixel depth, check out the docs: https://docs.travis-ci.com/user/gui-and-headless-browsers/#Using-xvfb-to-Run-Tests-That-Require-a-GUI

Did this help you? Follow me on Twitter: @iamakulov

npm 4 is splitting the “prepublish” script into “prepublishOnly” and “prepare”

Updated 24 Jun 2017: reflected changes in plans about npm v5..v6.

On October 20, npm is releasing v4.0.0. This release, apart from the other breaking changes, also includes one affecting a lot of packages: the prepublish npm script will be split into prepublishOnly and prepare.

📅 💥

Why#

In v1.1.71, npm made the prepublish script also execute when you run npm install without arguments. Before this, npm ran the script only before you publish a package.

The reasoning behind this isn’t clear, but as far as I’ve got it’s the following. You usually run npm install without arguments when you clone a package, go into its directory and try installing its dependencies. If you’re doing this, you’re most likely a developer, and you’re going to do something with this package; therefore it’ll be useful to prepare the package for using. Since the prepublish script often includes commands that build the package for publishing (= prepare it for using), npm decided to execute it in such case to do this job.

However, this prepublish behavior became disliked:

  • It’s weird. prepublish is pre + publish, and a lot of people didn’t assume it’s also being run when installing dependencies. I even thought it’s a bug in npm when I first discovered the way it works.

  • It creates problems. Many projects I’ve seen put building and testing commands into the prepublish script. Even npm recommends doing this. It’s convenient: it prepares the package for publishing and prevents an occasional release of broken code.
    However, if you use a CI environment like Travis or Appveyor which installs a new version of the package on each build, things become worse. Your build and test tasks get executed twice, once on npm install and once on the actual npm test. And this creates you problems such as increased build time or wrong build status.

Current behavior is disliked

What’s next#

npm 4 is splitting the prepublish script into two new: prepare and prepublishOnly.

  • prepare will have the same behavior that prepublish has now. Commands in this script will run both before publishing and on npm install.

  • prepublishOnly, as seen from its name, will run only before publishing the package.

  • Also, prepublish will receive a warning about the changes.

npm realizes that prepublishOnly is an ugly name for a script, Therefore, there’re also some other changes planned for the later releases.

  • npm 5 will un-deprecate previously deprecated prepublish, make it run only before publishing, and will deprecate prepublishOnly. In this release, prepublish will get back its expected behavior.

  • npm 6 or later will remove prepublishOnly completely. After this, two scripts will remain: prepublish which will be run only before publishing, and prepare which will be executed both on before publishing and on npm install.

Update 24 Jun 2017: the plan above was true at the moment of publishing, but seems like npm doesn’t follow it now. See a twitter thread with @maybekatz for more details.

There will be changes in npm 4…6

What to do when npm 4 is out#

Decide based on what your package needs.

  • If your package’s prepublish script contains commands that should only be run before npm publish, rename the script into prepublishOnly. Examples of such commands are npm test and eslint.
  • If your package’s prepublish script contains commands that should run both before npm publish and on npm install, rename the script to prepare. Examples of such commands are commands that build your package (e. g. webpack or babel).
  • If you don’t know, rename the script to prepublishOnly – this is the behavior most people expect. (As another option, you can leave everything as-is, but there’s no point: it will just delay the decision, but not remove it.)

P.S. If you like this, follow me on Twitter. I tweet selected articles and my own thoughts: https://twitter.com/iamakulov

React anti-pattern: don’t make <li> your component’s root

Noticed a React anti-pattern while mentoring a younger front-end developer on our project.

Imagine you have a component that represents a list of articles. At one point, you realize that each article in the list is too complex:

const ArticleList = (props) => {
  return <div class="articles">
    <ul class="article-list">
      { props.articles.map(article => 
        <li class="article">
          <h2 class="article__title">{ article.title }</h2>
          { /* 25 other tags */ }
        </li>
      ) }
    </ul>
    { /* ... */ }
  </div>;
}

So you decide to move the item to a separate component. You take that code inside map(), extract it into <Article> and get something like this:

const Article = (props) => {
  return <li class="article">
    <h2 class="article__title">{ props.title }</h2>
    { /* 25 other tags */ }
  </li>;
}

const ArticleList = (props) => {
  return <div class="articles">
    <ul class="article-list">
      { props.articles.map(article => 
        <Article title={article.title} { /* other props */ } />
      ) }
    </ul>
    { /* ... */ }
  </div>;
}

Don’t do it this way. This approach is wrong. The problem is that by taking a <li> and making it a root of the component, you’ve just made your component non-reusable. This means that if you’d like to reuse <Article> in another place, you’ll only be able to apply it somewhere inside a list – because of this <li>. If you decide to render <Article> into e.g. a <div>, not only will this be non-semantic (<li> can only appear inside of <ul>s), but will also add unnecessary list item styling which is super weird.

Solution#

The solution is simple: move the <li> back into the <ArticleList> component and make the <Article>’s root element a <div> or something else. This will probably require some refactoring in your styles, but will make the component reusable. Look how cool:

const Article = (props) => {
  // Notice: <li>s are gone
  return <div class="article">
    <h2 class="article__title">{ props.title }</h2>
    { /* ... */ }
  </div>;
}

const ArticleList = (props) => {
  return <div class="articles">
    <ul class="article-list">
      { props.articles.map(article => 
        <li class="article-list__item">
          <Article title={article.title} { /* other props */ } />
        </li>
      ) }
    </ul>
    { /* ... */ }
  </div>;
}

// And now you can easily render an article inside of a sidebar – have no idea why though
const Sidebar = (props) => {
  return <div class="sidebar">
    <div class="sidebar__article">
      <Article title="Look ma" { /* other props */ } />
    </div>
    { /* ... */ }
  </div>;
}

UI testing, Selenium, mocking AJAX requests and Likely

Likely are well-designed social buttons:

I’m currently working on covering them with UI tests using Selenium. So far, several notes:

  • Selenium is cross-platform, but different platforms support different sets of functionality. Node.js isn’t the most complete one, unfortunately. If you google how to do something with Selenium, find a StackOverflow reply with the Java API and try to do the same in JavaScript, don’t expect it will definitely work. That API could just be absent.

  • Selenium 3 is coming, but most tutorials focus on Selenium 2. Selenium 2 was released in 2011, and version 3 is expected to be released this year. In fact, the selenium-webdriver npm package already installs 3.0.0-beta.2. There’re no major breaking changes between 2.53.2 and 3.0.0, but expect that some tutorial code could just not work.

  • The selenium docs are scattered between different places, and it’s hard to find the right thing when you’re googling something. One part of the documentation is at docs.seleniumhq.org, another is in the repository wiki, etc. It was quite hard to find the proper actual API docs for JavaScript, so here are they: http://seleniumhq.github.io/selenium/docs/api/javascript/

  • Mock the external services when doing integration tests. When testing the sharing counters, we rely on responses from the social networks. Turns out these services don’t always work well (especially Facebook and Google+) which makes the tests fail. Viktor Karpov suggested to mock the responses, and it seems it’s a default way of doing the integration tests which I didn’t know. I’m working on this now.

  • Mocking AJAX requests with Selenium is hard. I need to mock them to simulate the social network responses (see the previous point). So far, I’ve only found two libraries that can help with this: Sinon.js and xhr-mock. Sinon.js is popular and heavily featured, but it has quite a complex API, and I haven’t yet succeeded in making it work. xhr-mock is way simpler and can also mock only specific URLs (which is more complicated with Sinon), but it doesn’t support XMLHttpRequest.prototype.addEventListener and doesn’t have a UMD build. Sadly.

You can follow the pull request I’m working in to stay tuned (and see how we manage to do the AJAX mocking): https://github.com/ilyabirman/Likely/pull/73

Asking good questions when mentoring a person

We have a new Junior/Middle front-end developer on our project, and I’ve been mentoring him for a couple of days. My responsibility as a mentor is to help the developer understand the most parts of the project in the shortest time. As a part of achieving this, I regularly ask him two things in our conversations:

  • “Do you have any questions?” and
  • “Have I explained this well?”

“Do you have any questions?”#

This one is pretty obvious to ask, but I try to repeat it as often as I can so any questions the developer comes up with are answered quickly:

  • Arriving at the office in the morning: “Hey, how’re things going? Do you have any questions?”
  • Leaving after assigning a task: “Feel free to ping me if you have any questions”
  • Sitting with a mentee in a pause while waiting for a module to build: “By the way, do you have any questions about the system or is something not entirely clear?”

The point is to make the developer super-comfortable to ask any questions he gets. The more he asks, the quicker he learns.

“Have I explained this well?”#

I find this exact question extremely useful, and I feel like it’s my little invention (haven’t seen anyone using it yet). I ask it every time I explain something to the mentee to make sure I’m clear, and the mentee’s level of knowledge is enough to understand the stuff:

  • “So this is how $module.require works… Have I explained this well?”

I prefer this question more than “Do you have any questions?” because the latter feels too official to me in this context.

The point about the question is that you should ask it in exactly the specified form. It’s easy to transform it to “Is this clear to you?” or “Do you get this?”, but you shouldn’t do this. All these latter questions are about the mentee and their perceptional abilities and could make them feel insecure if they answer “No.” This decreases the communication between them and you and is definitely not your goal. I only find the “Have I explained this well?” form to be not about the mentee and therefore be safe.

Bonus question: “Can you explain this to me?”#

This one is useful too. I ask it to check that the mentee fully understood the topic we were talking about. If the developer answers well, then it’s cool; if he doesn’t, I notice the points where he gets stuck, and help him with them.

Not only mentoring#

These questions are useful not only when you’re mentoring someone, but also when you give a talk, a lecture, conduct training, etc.

For example, a lot of speakers only answer questions at the end of their speech, when a half of the listeners have already forgotten what they wanted to ask about. I tend to ask “Do you have any questions?” after each major part of my talk. This has two advantages:

  • attendees understand the speech better because we speak of the material that was on the screen just a moment before that,
  • and there’re fewer situations like “Could you please switch to slide 2” when you’re on slide 53.

I used this approach this with “Redux in real life” and in a company’s internal React training, and seems like it worked well.

“composes:” in CSS Modules

On our project in EPAM, we’re currently busy with integrating React stack into our infrastructure. Had an interesting discussion about CSS Modules today: should we use composes in our code?

Several interesting points:

  • composes is an official way to compose classes, however, it breaks compatibility with the real CSS. If we use composes, it’d be hard to migrate from CSS Modules to something else in the future.
  • Shadow DOM is cool and should be released in the major browsers pretty soon. A colleague believes once Shadow DOM becomes widely available, CSS Modules will get much less popular pretty soon. A major advantage of Modules is the incapsulation of styles, and Shadow DOM does this natively. Therefore, using CSS Modules in a long-term project is probably a bad idea.
  • There’s no official documentation on why composes was chosen over the traditional way of combining several classes, like <button class=”button button-green”>. Probably I haven’t found it. I believe composes exists because it is cleaner than combining several classes:
    <!-- With composes -->
    <button className={styles.buttonGreen}>
    
    <!-- Without composes -->
    <button className={styles.button + ' ' + styles.buttonGreen}>
    

    but the real decision is still unclear.

(Originally published on Tumblr.)