Designing APIs: use arrays instead of rest parameters

Or why _.get(object, ['deep', 'prop']) is better than _.get(object, 'deep', 'prop').

Imagine you’re designing a function that accepts a variable number of arguments. Like getDeepProperty():

function getDeepProperty(<object> and <chain of nested fields>) {
  // Retrieve the deep property and return it
}

And you’re facing a choice: should you pass the chain of fields directly:

function getDeepProperty(object, ...fields) { /* ... */ }

getDeepProperty(someData, 'i', 'love', 'designing', 'apis');

or as an array:

function getDeepProperty(object, fields) { /* ... */ }

getDeepProperty(someData, ['i', 'love', 'designing', 'apis']);

Earlier, I preferred the former way because it seemed “cleaner”. Now, I use the latter one – because it makes the function forward-compatible.

At some moment in the future, you might want to pass an additional parameter specifying the default return value – i.e., what the function should return if the deep property is absent. The only backwards-compatible way to do this is to pass this parameter as the last argument to the function, like this:

function getDeepProperty(
  <object>,
  <chain of fields>,
  <default return value>
) {
  // Retrieve the deep property and return it,
  // or return the default value
}

And here comes the difference. If your function accepts an array, you just append a new argument, do a switch (arguments.length) inside your function body, and the old code keeps working:

function getDeepProperty(...args) {
  if (args.length === 3) {
    const [object, fields, defaultValue] = args;
    // Execute the new behavior
  } else {
    const [object, fields] = args;
    // Execute the old behavior
  }
}

// The new API calls work great: a user passes three arguments,
// the function understands this and returns 'no'
getDeepProperty({}, ['i', 'love', 'designing', 'apis'], 'no');

// The old API calls keep working: a user passes two arguments,
// the function works as usual and e.g. throws an exception
getDeepProperty({}, ['i', 'love', 'designing', 'apis']);

But if your function accepts a variable number of arguments, you become unable to add an argument without breaking the old API users. The function can’t understand whether the last parameter is the default return value or a value in the chain of fields:

function getDeepProperty(object, ...fieldsAndDefaultValue) {
  // So, is fieldsAndDefaultValue[fieldsAndDefaultValue.length - 1]
  // a default value or just a field in a chain of fields?
  // You can’t know

  // Execute the new behavior
}

// The new API works great: the function returns 'no'
getDeepProperty({}, 'i', 'love', 'designing', 'apis', 'no');

// But the old API breaks: the function returns 'apis'
getDeepProperty({}, 'i', 'love', 'designing', 'apis');

So, here’s the rule:

When defining a function, prefer arrays over variable number of arguments

How to optimize images in webpack

Images take more than a half of the size of an average page:

A pie chart. Title: “Average bytes per page per content type.” Text in the bottom: “Total 3422 kB”. The largest pie chart section: “Images – 1818 kB.”

That’s a lot of traffic! But with webpack, it’s easy to decrease it.

1. Inline small PNG, JPG and GIF images#

Use url-loader to embed small PNG, JPG and GIF images into the bundle.

url-loader converts a file (if it’s smaller than the specified size) into a Base64 URL and inserts this URL into the bundle. This helps to avoid extra image requests (which is useful even with HTTP/2).

The limit of 5-10 KB is OK:

// webpack.config.js
module.exports = {
  module: {
    rules: [
      {
        test: /\.(jpe?g|png|gif)$/,
        loader: 'url-loader',
        options: {
          // Images larger than 10 KB won’t be inlined
          limit: 10 * 1024
        }
      }
    ]
  }
};

2. Inline small SVG images#

Use svg-url-loader to embed small SVG images.

This loader works like url-loader, but it encodes files using the URL encoding instead of the Base64 one. Because SVG is text, the result of the URL encoding is smaller.

The limit of 5-10 KB is also OK:

// webpack.config.js
module.exports = {
  module: {
    rules: [
      {
        test: /\.svg$/,
        loader: 'svg-url-loader',
        options: {
          // Images larger than 10 KB won’t be inlined
          limit: 10 * 1024,
          // Remove quotes around the encoded URL –
          // they’re rarely useful
          noquotes: true,
        }
      }
    ]
  }
};

3. Optimize image size#

Use image-webpack-loader to make images smaller.

This loader compresses PNG, JPG, GIF and SVG images by passing them through optimizers. Since it just pipes images through itself and doesn’t insert them into the bundle, it should be used with url-loader/svg-url-loader.

The default loader settings are OK:

// webpack.config.js
module.exports = {
  module: {
    rules: [
      {
        test: /\.(jpg|png|gif|svg)$/,
        loader: 'image-webpack-loader',
        // Specify enforce: 'pre' to apply the loader
        // before url-loader/svg-url-loader
        // and not duplicate it in rules with them
        enforce: 'pre'
      }
    ]
  }
};

Questions#

“Why is this important?”
As I’ve said, images take more than 50% of the average page size, and optimizing them is super-easy. Through, at the same time, I’ve rarely seen webpack configs that do it. We seriously should always optimize them.

“What should I do?”
Go and add these loaders to your config.

“Are the any side effects?”
A couple:

  • image-webpack-loader increases the build time, so it’s better to disable it during development (pass the bypassOnDebug: true option to do that)
  • url-loader and svg-url-loader remove extra image requests, but break caching of these images and increase the JS loading/parsing time and memory consumption. If you inline large images or lots of images, you might experience issues. (Thanks to Addy Osmani for noting this.)

Further reading#

How to effectively ask for permissions in web

Matt Wilcox writes that it’s meaningless to ask a person to subscribe for notifications when they’re visiting a site for the first time.

He’s right. Here’s how to ask for permission to make it effective:

1. Find the right moment#

In mobile apps, 60-70% of users dismiss the permission request if it’s requested straight on the first launch.

Asking the user to subscribe for notifications when they visit a site for the first time is ineffective. They don’t know anything about you yet. It’s likely they’ll just block your request.

Instead, find the right moment:

Wrong Right Why
Asking to share the location when a user opens a pizzeria site Asking to share the location when a user clicks “Show pizzerias nearby” on a pizzeria site In the latter case, it’s clear why the site is asking for the permission. In the former case, it’s not
Suggesting to subscribe for notifications when a user visits a news site for the first time Suggesting to subscribe for notifications when a user visits a news site for a third time in a week In the latter case, the user is frequent, so they might find notifications relevant. In the former case, they don’t even know what content the site has

2. Show a custom permission request at first#

This is how e.g. a Russian media called TJournal does this:

A custom non-modal popup in the top left corner of the window. Text: “Would you like to subscribe to important news from TJ?” Buttons: “Yes, I would” and “Close”
“Would you like to subscribe to important news from TJ?” – “Yes, I would”

TJournal won’t trigger the browser request until the user clicks the “Yes, I would” button. There’re two reasons for this:

  • If the user blocks the browser request, you won’t be able to ask for the permission again. On the contrary, if the user dismisses your custom request, you’ll still be able to ask again in a different situation – e.g., when a user clicks on a “Subscribe” button in a different part of site.
  • The browser request is non-customizable. You can’t put a picture or a custom text there. But you can with a custom request.

3. Finally, if a user accepted the request, show them the browser dialog#

This one:

That’s it.

Further reading#

Describe your React propTypes as deeply as possible

On my project, I’ve been noticing code like this:

class Header extends React.Component {
  static propTypes = {
    items: PropTypes.array,
    counters: PropTypes.object,
  };
  
  // ...
}

This is how it should look like instead:

class Header extends React.Component {
  static propTypes = {
    items: PropTypes.arrayOf(PropTypes.shape({
      id: PropTypes.string.isRequired,
      name: PropTypes.string.isRequired,
      link: PropTypes.string.isRequired,
    })).isRequired,
    counters: PropTypes.objectOf(PropTypes.number).isRequired,
  };

  // ...
}

The difference is that in the latter component, propTypes are much more detailed. It’s better for two reasons:

  • React validates your props better. In the former component, you won’t get any warnings if you pass a wrong array into items or if you forget to pass it at all. Instead, you’ll have a wrong rendering result or a runtime error and will have to debug it.
  • You understand the interface of the component easier. This is even more important.

    With the latter component, to understand the structure of items, you just look at its propTypes. With the former one, you have to dive into its code. It’s not a problem when the component has been created just 10 minutes before, and you remember what it accepts, but it makes further support way easier.

There’s only one case when I find it acceptable to skip some propTypes definitions. It’s when your component just passes a prop to a child component and doesn’t care about its structure. In this case, the child component should validate the prop:

Note how the items
propType in Header cares only about the id field it uses, and counters doesn’t care about its items type at all.
class Header extends React.Component {
  static propTypes = {
    items: PropTypes.arrayOf(PropTypes.shape({
      id: PropTypes.string.isRequired,
    })).isRequired,
    counters: PropTypes.objectOf(PropTypes.any).isRequired,
  };

  render() {
    return <div>
      {this.props.items.map(item =>
        <HeaderItem item={item} counter={this.props.counters[item.id]} />
      }
    </div>;
  }
}

class HeaderItem extends React.Component {
  static propTypes = {
    item: PropTypes.shape({
      name: PropTypes.string.isRequired,
      link: PropTypes.string.isRequired,
    }).isRequired,
    counter: PropTypes.number.isRequired,
  };

  // ...
}

Here’s the rule:

Describe your propTypes as deeply as possible

Short basics of caching

I’ve finally configured caching on my site. Here’s what you need to know.

Headers#

There’re 4 headers that enable caching: Cache-Control/Expires and Last-Modified/ETag. The former two are primary; they enable caching and instruct the browser on how long it should save a resource. The latter two are secondary and optional; browsers use them when the cached resource gets expired to check if it has changed. (If it hasn’t, browsers just take the expired one and keeps using it.)

In practice, you choose 2 of these headers: one primary and one secondary – and use them together. Using all four headers isn’t very practical – the browser will rely on only two of them.

I recommend choosing Cache-Control and ETag. Cache-Control lets you configure the caching details that Expires can’t. ETag, according to MDN, is more reliable than Last-Modified.

Use Cache-Control and ETag

Lifecycle#

Imagine you have a file called pic.gif. This one:

This is how its lifecycle will look:

  1. The browser requests pic.gif. The server sends the response with, for example, these caching headers:

    Cache-Control: max-age=60
    ETag: deadbeef123
    
  2. The user refreshes the page. If less than 60 seconds have passed (60 is a value from Cache-Control: max-age), the browser doesn’t make any requests and just takes pic.gif from the cache.
  3. The user refreshes the page. If more than 60 seconds have passed (60 is a value from Cache-Control: max-age), the browser sends a request for pic.gif and attaches the If-None-Match: deadbeef123 header. (deadbeef123 is a value from the ETag header that the browser has received.)

    When the server receives the request, it reads pic.gif and calculates its ETag (ETag is a hash which changes when the file changes). And then:

    • if the calculated ETag is still deadbeef123, the file hasn’t changed. The server returns an empty response with the 304 Not Modified status.
    • if the calculated ETag is different, the file has changed. The server returns the content of pic.gif with the 200 OK status and new Cache-Control and ETag headers.
Servers respond with either 304 Not Modified or with a new resource

Total immutability#

Usually, on the third step (↑), when the resource expires, the browser makes a request to the server. If the file has changed, the browser downloads the new version. But if it hasn’t, the browser receives 304 Not Modified and doesn’t download anything. That’s nice, but the extra request to the server is still there.

Each network request brings a delay

If you know that the resource will never change, and checking this doesn’t make any sense, you can send the immutable value in the Cache-Control header:

Cache-Control: max-age=60, immutable

or simply

Cache-Control: immutable

After this, the browser will always consider the cached resource as valid and will never send a verification request for it. It’s like if you set max-age to 1000 years.

Cache-Control: immutable is a new header value. At the moment, it works only in Firefox and Edge.

Use Cache-Control: immutable to prevent any additional requests

Versioning#

On my site (except this blog), I enabled Cache-Control: immutable for all images, styles, and scripts. To force the browser to re-download the file if it changes, I append the last change date to the file name:

/images/pic.gif?hash=1499433448

This way, the browser will send a request for the file only when the file (and, therefore, its name) changes.

This approach—including a dynamic value into the file name—is called versioning. Versioning is a common practice, and I recommend enabling it in your app.

Unlike versioning, Cache-Control: immutable hasn’t become a common practice yet. However, it’s already being used by e.g. Facebook, so you can try enabling it too.

Use versioning, it’s a common practice

Summing up#

  • Use Cache-Control and ETag headers for caching
  • Implement versioning for cache invalidation
  • Try Cache-Control: immutable if you have resources that will never change

Malicious packages in npm. Here’s what to do

Here’s all the information I’ve found.

?☠️?

What happened?#

People found malicious packages in npm that work like real ones, are named similarly real ones, but collect and send your process environment to a third-party server when you install them:

This is dangerous because, on CI servers, the environment usually includes different secret tokens.

What to do if I’m a user?#

Regenerate the secret tokens if you installed any package from these as a dependency:

A screenshot of the cached page with packages

npm has also confirmed this list

babelcli - v1.0.1 - Babel CLI for Nodejs
crossenv - v6.1.1 - Run scripts that set and use environment variables across platforms
cross-env.js - v5.0.1
d3.js - v1.0.1 - d3.js for Nodejs
fabric-js - v1.7.18 - Object model for HTML5 canvas, and SVG-to-canvas parser. Backed by jsdom and node-canvas.
ffmepg - v0.0.1 - FFmpeg for Nodejs
gruntcli - v1.0.1 - Grunt CLI for Nodejs
http-proxy.js - v0.11.3 - Node.js proxy tools
jquery.js - v3.2.2-pre - jquery.js for Nodejs
mariadb - v2.13.0 - A node.js driver for mysql. It is written in JavaScript, does not require compiling, and is 100% MIT licensed.
mongose - v4.11.3 - Mongoose MongoDB ODM
mssql.js - v4.0.5 - Microsoft SQL Server client for Node.js.
mssql-node - v4.0.5 - Microsoft SQL Server client for Node.js.
mysqljs - v2.13.0 - A node.js driver for mysql. It is written in JavaScript, does not require compiling, and is 100% MIT licensed.
nodecaffe - v0.0.1 - caffe for Nodejs
nodefabric - v1.7.18 - Object model for HTML5 canvas, and SVG-to-canvas parser. Backed by jsdom and node-canvas.
node-fabric - v1.7.18 - Object model for HTML5 canvas, and SVG-to-canvas parser. Backed by jsdom and node-canvas.
nodeffmpeg - v0.0.1 - FFmpeg for Nodejs
nodemailer-js - v4.0.1 - Easy as cake e-mail sending from your Node.js applications
nodemailer.js - v4.0.1 - Easy as cake e-mail sending from your Node.js applications
nodemssql - v4.0.5 - Microsoft SQL Server client for Node.js.
node-opencv - v1.0.1 - OpenCV for Nodejs
node-opensl - v1.0.1 - OpenSSL for Nodejs
node-openssl - v1.0.1 - OpenSSL for Nodejs
noderequest - v2.81.0 - Simplified HTTP request client.
nodesass - v4.5.3 - Wrapper around libsass
nodesqlite - v2.8.1 - SQLite client for Node.js applications with SQL-based migrations API
node-sqlite - v2.8.1 - SQLite client for Node.js applications with SQL-based migrations API
node-tkinter - v1.0.1 - Tkinter for Nodejs
opencv.js - v1.0.1 - OpenCV for Nodejs
openssl.js - v1.0.1 - OpenSSL for Nodejs
proxy.js - v0.11.3 - Node.js proxy tools
shadowsock - v2.0.1 - A tunnel proxy that help you get through firewalls
smb - v1.5.1 - A Pure JavaScript SMB Server Implementation
sqlite.js - v2.8.1 - SQLite client for Node.js applications with SQL-based migrations API
sqliter - v2.8.1 - SQLite client for Node.js applications with SQL-based migrations API
sqlserver - v4.0.5 - Microsoft SQL Server client for Node.js.
tkinter - v1.0.1 - Tkinter for Nodejs

Here’s also a one-liner that will list these packages if any of them was installed as a dependency:

Twilio also listed one-liners for checking the whole file system at once (for bash and Powershell)
npm ls | grep -E "babelcli|crossenv|cross-env.js|d3.js|fabric-js|ffmepg|gruntcli|http-proxy.js|jquery.js|mariadb|mongose|mssql.js|mssql-node|mysqljs|nodecaffe|nodefabric|node-fabric|nodeffmpeg|nodemailer-js|nodemailer.js|nodemssql|node-opencv|node-opensl|node-openssl|noderequest|nodesass|nodesqlite|node-sqlite|node-tkinter|opencv.js|openssl.js|proxy.js|shadowsock|smb|sqlite.js|sqliter|sqlserver|tkinter"

Always check the name of packages you’re installing. You can look at the downloads number: if a package is popular but the downloads number is low, something is wrong.

What to do if I’m a library developer?#

I see two options:

  • Use scopes (@scope/package-name) for your packages. With scopes, it’s harder to install a wrong package accidentally: a user would have to misspell both the scope name and the package name. Unfortunately, it’s not: it’s enough to misspell just the scope name (e.g @babel/babel-cli@bable/babel-cli). Scopes might help a bit because they can have a simple name that’s harder to misspell, but it’s still not a universal solution.
  • Take the most common misspellings of your packages by yourself. Think of the most common misspellings and publish empty packages under these names. You can also warn users about the right name with npm deprecate.

Is this even OK?#

This isn’t surprising – npm doesn’t have any protection against this yet. In fact, that’s why there could be other malicious packages. Stay careful and check package names.

npm is working on a solution though:

You can also participate in the Yarn’s discussion about a white list for preinstall/postinstall script packages.


How to optimize resizing or scrolling

If you listen for events like mousewheel, resize or scroll, your page could get slow. These events are generated multiple times per second, and if the event handler takes too much time, the browser won’t catch with redrawing the page.

This is what to do if you have such problem.

Throttle#

By default, the event handler is executed on each event. Sometimes, when the handler is taking a long time, it might be acceptable to delay its execution to once per 100-200 ms. This “delaying” can be achieved with the _.throttle utility method.

When is this useful? E.g. if you recalculate the page layout each time the browser resizes. If recalculating layout takes a long time, you could perform it less often.

Before and after:

// Before
window.addEventListener('resize', () => {
  calculateLayout(); // Takes 20 ms
});

// After
window.addEventListener('resize', _.throttle(() => {
  calculateLayout(); // Still takes 20 ms, but now runs once in 100 ms
}, 100));

passive: true#

passive: true a flag that’s passed into addEventListener. It tells the browser that the event handler will never call event.preventDefault(). Using this knowledge, the browser can start doing the event action (e.g. scrolling) without waiting for the JS code to finish. This makes the page smoother.

Currently, only touchstart, touchmove and mousewheel event handlers could be made passive.

When is this useful? E.g. if you redraw the parallax background on each touch or scroll event. Most likely, it won’t be a problem if the browser starts scrolling before the background finishes redrawing. If so, such event handler could be made passive.

Before and after:

// Before:
window.addEventListener('touchstart', updateBackground)

// After:
window.addEventListener('touchstart', updateBackground, {
  passive: true
})

Use alternative APIs#

For some common tasks, there are alternative APIs that help to perform the task easier and with better performance:

  • Intersection Observer. It helps if you need to detect when an element goes off the screen or intersects with another element. This API can replace the scroll and resize listeners.
  • window.matchMedia. This API can notify you when a specific media query becomes true. Helps if you need to e.g. update the page layout when the viewport reaches a specific width. It can replace the resize listeners.
  • position: sticky. This CSS property lets you stick an element to the top when it reaches an edge of the viewport. Helps if you need to e.g. make a sticky page header. It can replace the scroll listeners that switch the element from position: static to position: fixed and vice versa.
  • At the moment of July 2017, the API is not yet well-supported. However, there’s a polyfill.

    Resize Observer. It helps if you need to detect when an element gets resized. This API can replace the scroll and resize listeners.

    Thanks to Vitali Kuzmich for mentioning this approach.

Optimize the code itself#

You can also make the event handler itself run faster. It should take not more than 10 ms to run.

To analyze how much time your handler takes, use Web Performance API or the Performance tab in Chrome DevTools:

The optimization approach depends on your code. Try caching some data or skipping some computations. If you use React, you can try dropping parts of the render tree with shouldComponentUpdate.

And this is what won’t work:#

  • requestAnimationFrame. It doesn’t help with slow event handlers and, by my tests, doesn’t bring any benefits for fast ones. Seems like it’s only useful for scheduling JS animations.
  • Event delegation. It optimizes the memory usage, not the speed.

That’s it. Optimize.

Case study: improving a popular library’s size for webpack users

There’s a library called Polished. It’s a utility collection for writing styles in JavaScript.

The polished logo

And it had a problem.

Problem#

A story in three tweets:

So, this code:

import { opacify, transparentize } from 'polished'; 

generates a much larger bundle than this code:

import opacify from 'polished/lib/color/opacify.js';
import transparentize from 'polished/lib/color/transparentize.js';

even despite the Polished’s bundle is built with ES modules and tree-shaking is enabled.

Let’s find out what causes this.

Investigation#

1. Verify the entry point#

Environment: [email protected] and [email protected] ([email protected] gives the same result)

At first, let’s check that import { ... } from 'polished' picks up a file written with ES exports. If it doesn’t, webpack can’t do any tree-shaking at all.

When you import a package, webpack understands what exact file to use by looking into specific fields in package.json. Polished’s package.json has two of them:

{
  "name": "polished",
  "description": "A lightweight toolset for writing styles in Javascript.",
  "main": "lib/index.js",  // This one
  "module": "dist/polished.es.js",  // And this one
  ...
}

Webpack prefers module over main. module points to dist/polished.es.js, and this file does have an ES export:

// polished/dist/polished.es.js
...
export { adjustHue$1 as adjustHue, ... };

This point is OK.

2. Check if there’s unused code that’s unnecessarily kept#

polished/dist/polished.es.js is written with ES exports. This means that tree-shaking should work properly, and the unused imports shouldn’t be included into the bundle. Then why different imports produce different file sizes?

Side effect is when a function changes something outside of itself – e.g. writes a value to a global variable or initiates a network request

The most possible reason is that polished/dist/polished.es.js contains some code that’s absent in our polished/lib/... files and that can’t be simply dropped by the tree-shaker. This is the code that could cause side-effects. E.g. if a file includes a top-level function call, the tree-shaker can’t remove the function even if its result isn’t used. The function could be causing side effects, and removing it could break the app.

Let’s compare the bundles that we have after importing polished in two different ways and verify this case.

To do this, I create a package:

# Shell
mkdir polished-test && cd polished-test
npm init -y
npm install polished webpack@2

Add two files that import Polished in two different ways:

console.log() helps finding the index.js file in the bundle + prevents webpack from removing the imports as unused
// index-import-package.js
import { opacify, transparentize } from 'polished';

console.log('polished', opacify, transparentize);

// index-import-files.js
import opacify from 'polished/lib/color/opacify.js';
import transparentize from 'polished/lib/color/transparentize.js';

console.log('polished', opacify, transparentize);

Add a special webpack configuration that emits two bundles:

// webpack.config.js
const webpack = require('webpack');

module.exports = {
  entry: {
    // We’ll compare two different bundles,
    // thus two different entry points
    'bundle-import-package': './index-import-package.js',
    'bundle-import-files': './index-import-files.js',
  },
  output: {
    filename: '[name].js',
    path: __dirname,
  },
  plugins: [
    // We need to run UglifyJS to remove the dead code
    // (this will do tree-shaking), but prevent it
    // from uglifying the code (so it’s easier to read the bundle)
    new webpack.optimize.UglifyJsPlugin({
      // Disable several optimizations so that the bundle
      // is easier to read
      compress: { sequences: false, properties: false, conditionals: false, comparisons: false, evaluate: false, booleans: false, loops: false, hoist_funs: false, hoist_vars: false, if_return: false, join_vars: false, cascade: false },

      // Beautify the bundle after uglifying it
      beautify: true,

      // Don’t rename the variables
      mangle: false,
    }),
  ]
}

And run the build:

./node_modules/.bin/webpack

Now, I have two bundles, each with a different approach to importing stuff. I open them in my editor and switch to the structure view to their content. And here’s what I see:

A comparison between the content of two files. The left file is bundle-import-package.js, it has a lot of functions. The right file is bundle-import-files.js, it has much less functions.

bundle-import-package.js has more methods than bundle-import-files.js. Most likely, they are kept because of calls with side effects. Let’s dig deeper.

3. Find the exact cause of the problem#

So, bundle-import-package.js has a lot of functions that aren’t used but are still included. If we look through the file to see their usages, we’ll see a large snippet of code like this:

// bundle-import-package.js
// ...
function opacify(amount, color) {
    // ...
}
var opacify$1 = curry(opacify);
function desaturate(amount, color) {
    // ...
}
curry(desaturate);
function lighten(amount, color) {
    // ...
}
curry(lighten);
// ...

Here, desaturate and lighten are those unused functions, and opacify is a function we import in the client code.

This code comes to bundle-import-package.js from polished/dist/polished.es.js. The corresponding code in that file looks like this:

// polished/dist/polished.es.js
// ...
function opacify(amount, color) {
    // ...
}

var opacify$1 = curry(opacify);

function desaturate(amount, color) {
    // ...
}

var desaturate$1 = curry(desaturate);

function lighten(amount, color) {
    // ...
}

var lighten$1 = curry(lighten);
// ...

And this code comes into polished/dist/polished.es.js from the library sources. This is how it looks:

// polished/src/color/opacify.js
function opacify(amount: number, color: string): string {
  // ...
}

export default curry(opacify);

// polished/src/color/desaturate.js
function desaturate(amount: number, color: string): string {
  // ...
}

export default curry(desaturate);

// polished/src/color/lighten.js
function lighten(amount: number, color: string): string {
  // ...
}

export default curry(lighten);

So what happens here? dist/polished.es.js is built with Rollup. When the library authors do a build, Rollup grabs all the modules and converts exports (export default curry(lighten)) into variable assignments (var lighten$1 = curry(lighten)).

When we do import { opacify, transparentize } from 'polished', webpack tries to compile dist/polished.es.js and drop the unused code. It removes the desaturate$1 and lighten$1 variables because they aren’t exported, but it can’t drop the curry(darken) calls because curry could produce side-effects. And because functions like desaturate and lighten are passed into curry(), they are also kept in the bundle.

Screenshot of the editor
This is how you analyze the bundle: open the file structure, find a function that’s absent in the other bundle, and search for its usages

Solution#

To decrease the bundle size, we should do one of the following things:

Pure function is a function that doesn’t produce side effects
  • tell UglifyJS that it’s safe to remove curry() calls because it’s pure
  • or move currying into the functions instead of wrapping them.
Another option is passing compressor: { pure_funcs: ['curry'] } to the UglifyJS options, but Polished can’t control this

To tell UglifyJS that curry() calls are safe to remove, we have to mark each call with the /*#__PURE__*/ annotation. This way, the minifier will understand that this call is pure and will be able to optimize it:

We can’t just add the /*#__PURE__*/ annotation after export default. Rollup seems to remove comments if they are placed in that position
// polished/src/color/lighten.js
function lighten(amount: number, color: string): string {
  // ...
}
 
- export default curry(lighten);
+ const curriedLighten = /*#__PURE__*/curry(lighten);
+ export default curriedLighten;

The second approach is to move currying into the functions body. With it, we should do something like this:

// polished/src/color/lighten.js
- function lighten(amount: number, color: string): string {
-   // method body
- }
+ function lighten(...args) {
+   return applyCurried(function (amount: number, color: string): string {
+     // method body
+   }, args);
+ }
 
- export default curry(lighten);
+ export default lighten;

I prefer the first approach because it (almost) doesn’t complicate the code.

After adding the /*#__PURE__*/ annotations, minified bundle-import-package.js goes from 16 down to 11.8 kB. But that’s not the end – bundle-import-files.js is still smaller (9.86 kB). This is because there’re a few other places that should be optimized.

I’ll skip the part where I find them and jump right to the solution.

  • Change 1 and 2. Like with curry(), there’re two other places where the export is wrapped into a function. It’s polished/src/helpers/em.js and polished/src/helpers/rem.js. To optimize them, we should similarly add the /*#__PURE__*/ annotations.
  • Change 3. In polished/src/mixins/normalize.js, there’re two global objects that use computed object properties. When they are compiled, Babel transforms them to call the Babel’s defineProperty function. Because of this, UglifyJS can’t remove them. To solve the problem, we should either move these objects into the normalize() function that uses them or wrap them into getter functions.

And, when we apply these additional optimizations, we’ll have this:

                   Asset     Size  Chunks             Chunk Names
  bundle-import-files.js  9.87 kB       0  [emitted]  bundle-import-files
bundle-import-package.js  7.76 kB       1  [emitted]  bundle-import-package

bundle-import-package.js is now even smaller than bundle-import-files.js! Great.

I’ve submitted the pull request.

webpack for real tasks: decreasing front-end size and improving caching

This is the second part of a three-part introduction into webpack:

  1. Bundling front-end and adding compilation
  2. Decreasing front-end size and improving caching (you are here!)
  3. Speeding up build and improving the development workflow

Want to stay tuned for the future posts? Subscribe

Last updated on 21 Jan 2018: replaced the recommended plugin in the Moment.js part.

Task Decrease front-end size#

Given: you have a front-end application. You want to decrease its size to make it load faster.

Let’s see how webpack can help with this.

Minification#

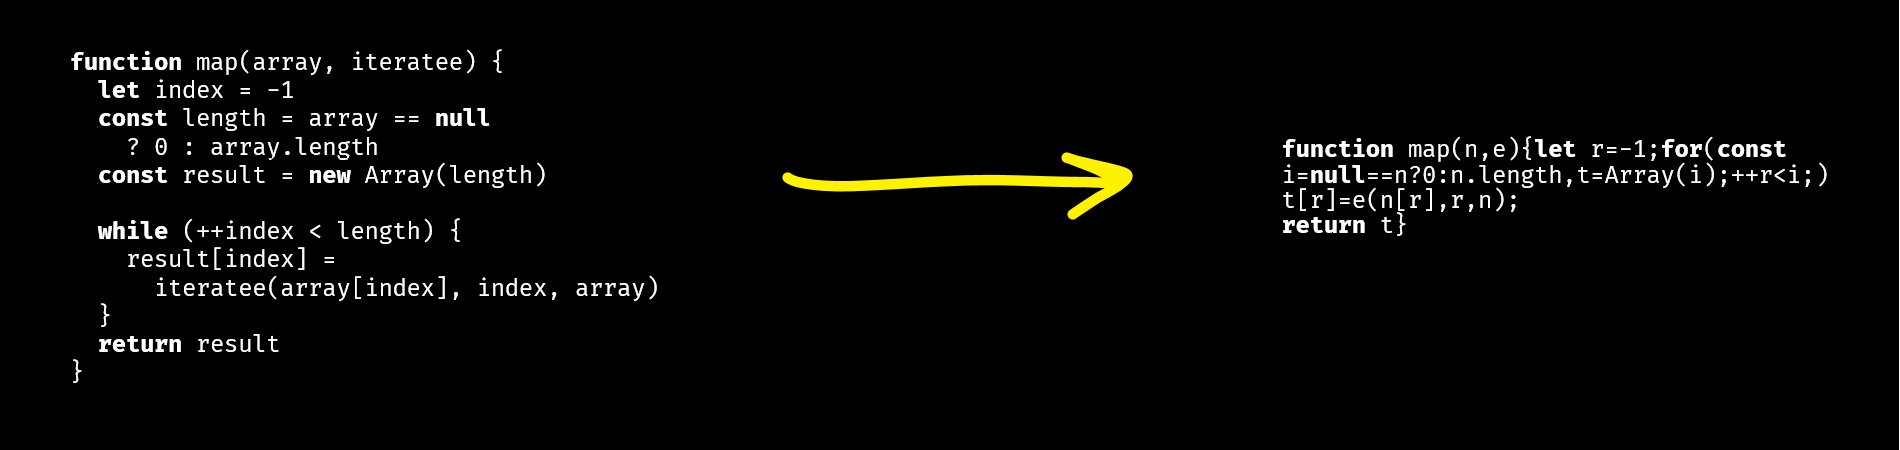
Minification is when you compress your code by removing extra spaces, shortening variable names, etc. Like this:

Webpack has two approaches to minify the code: the UglifyJS plugin and loaders options. They should be used simultaneously.

The UglifyJS plugin works on the level of the bundle and compresses it after compilation. As you might’ve guessed, it used UglifyJS under the hood. This is how it works:

You write code like this
// comments.js
import './comments.css';
export function render(data, target) {
    console.log('Rendered!');
}

Webpack compiles it into approximately the following
// bundle.js (part of)
"use strict";
Object.defineProperty(__webpack_exports__, "__esModule", { value: true });
var __WEBPACK_IMPORTED_MODULE_0__comments_css__ =
  __webpack_require__(4);
var __WEBPACK_IMPORTED_MODULE_0__comments_css___default =
  __webpack_require__.n(__WEBPACK_IMPORTED_MODULE_0__comments_css__);
__webpack_exports__["render"] = render;

function render(data, target) {
    console.log('Rendered!');
}

The UglifyJS plugin minifies it into approximately the following
// bundle.js (part of)
"use strict";function r(e,t){console.log("Rendered!")}
Object.defineProperty(t,"__esModule",{value:!0});
var o=n(4);n.n(o);t.render=r

To enable the plugin, add it to the plugins section of the config:

// webpack.config.js
const webpack = require('webpack');

module.exports = {
  plugins: [
    new webpack.optimize.UglifyJsPlugin()
  ]
};

The second approach is loaders options. It allows compressing things that UglifyJS can’t minify. Its point is that some code (e.g. CSS that you import) is compiled as a string which UglifyJS can’t handle:

/* comments.css */
.comment {
    color: black;
}

// bundle.js (part of)
exports = module.exports = __webpack_require__(1)();
exports.push([module.i, ".comment {\r\n    color: black;\r\n}", ""]);

To minify it, you should configure the loader. Here’s how you do it with css-loader:

// webpack.config.js
module.exports = {
  module: {
    rules: [
      {
        test: /\.css$/,
        use: [
          'style-loader',
          { loader: 'css-loader', options: { minimize: true } }
        ]
      }
    ]
  }
};

Pitfall: ES2015 code#

UglifyJS 2 (which is used in webpack) can’t compile ES2015+ code. This means that if your code uses classes, arrow functions or other new language features, and you don’t compile it to ES5, UglifyJS won’t handle it. In this case, you can use Babili, a Babel-based minifier. See babili-webpack-plugin

NODE_ENV=production#

Another way to decrease the front-end size is to set NODE_ENV environmental variable to the value “production”.

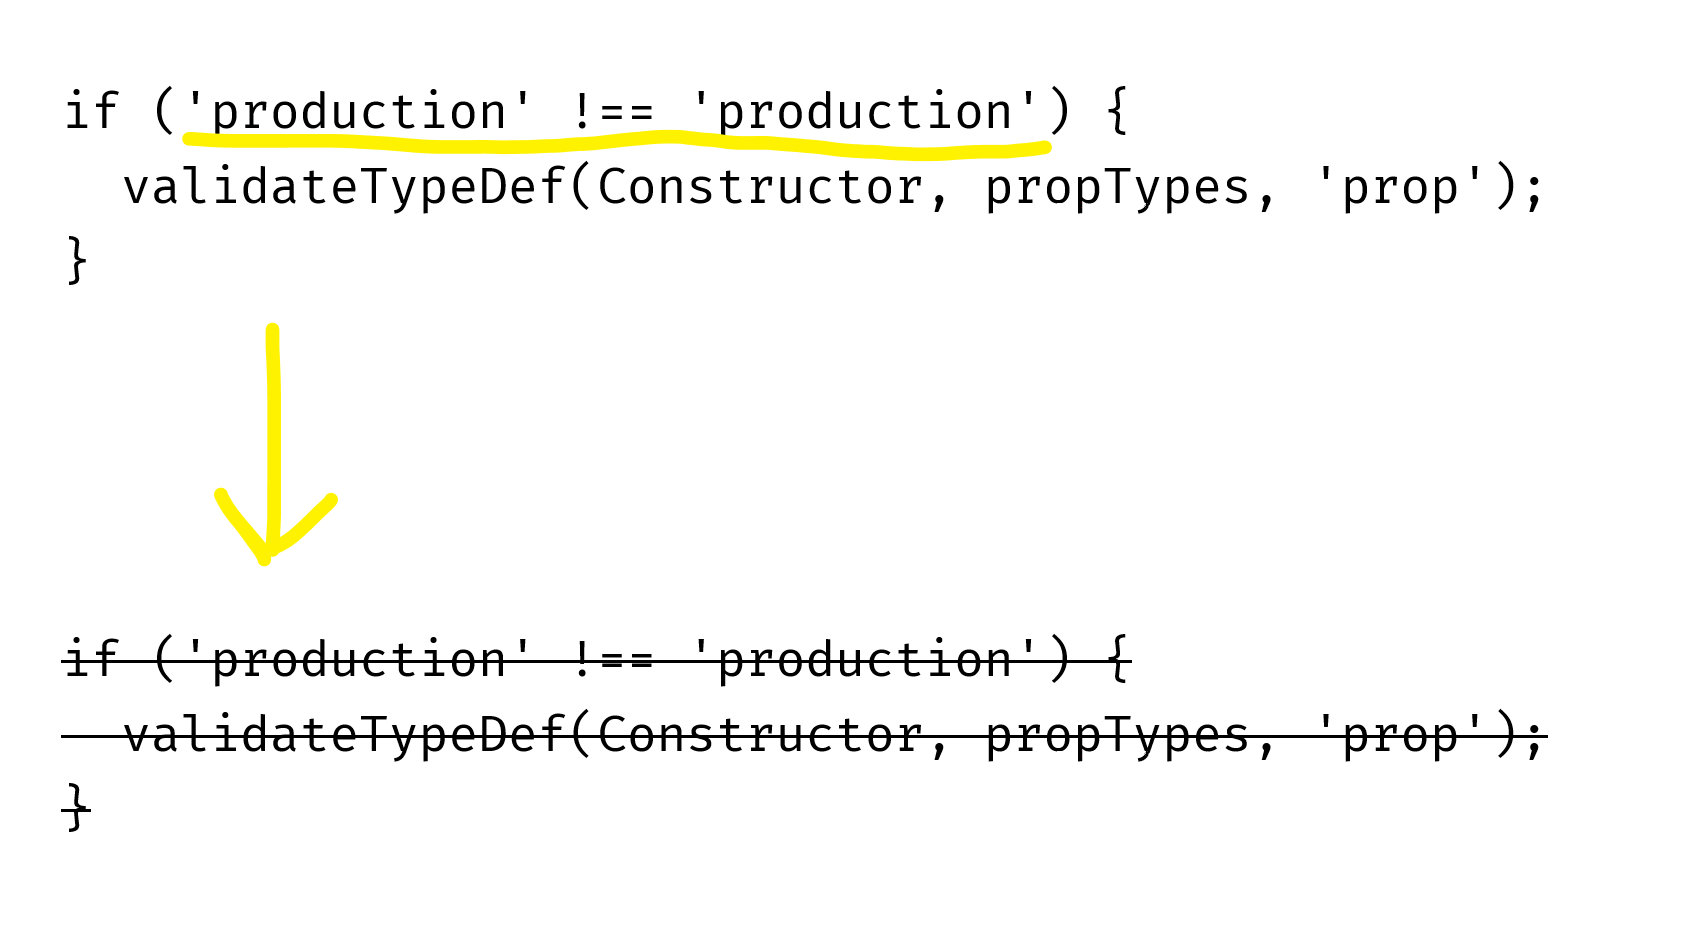
NODE_ENV is an environmental variable that is commonly used in libraries to detect in which mode the library works – in development mode or on a production server. The library can behave differently based on this variable. For example, React does additional checks and prints warnings when it’s built for development:

// …

if (process.env.NODE_ENV !== 'production') {
  validateTypeDef(Constructor, propTypes, 'prop');
}

// …

When you’re building your app for production, it’s better to also tell that your libraries. For Node.js libraries, it’s done by configuring the environment and setting the NODE_ENV variable to “production”. For front-end libraries, it’s done by replacing process.env.NODE_ENV with a specific value:

// webpack.config.js
const webpack = require('webpack');

module.exports = {
  plugins: {
    new webpack.DefinePlugin({
      'process.env.NODE_ENV': '"production"'
    })
  }
};

DefinePlugin takes an object with keys referring to variables to be replaced and values referring to the values that should be substituted. With this configuration, it’ll replace all process.env.NODE_ENV instances with "production", which will make UglifyJS understand that the comparison expression is always false and remove it:

ECMAScript imports#

The next way to decrease the front-end size is to use ECMAScript imports and exports.

When you use ECMAScript imports and exports, webpack becomes able to do tree-shaking. Tree-shaking is when a bundler traverses your whole dependency tree, checks what of them are used, and keeps only the used ones. So, if you use ECMAScript module syntax, webpack can eliminate the unused code:

You write two files where only one export is used
// comments.js
export const commentRestEndpoint = '/rest/comments';
export const render = () => { return 'Rendered!'; };

// index.js
import { render } from './comments.js';
render();

Webpack realizes that commentRestEndpoint is not used and doesn’t generate a separate export point in the bundle
// bundle.js (part of)
(function(module, __webpack_exports__, __webpack_require__) {
  "use strict";
  /* unused harmony export commentRestEndpoint */
  /* harmony export */__webpack_exports__["b"] = render;

  var commentRestEndpoint = '/rest/comments';
  var render = function () { return 'Rendered!'; }
})

UglifyJS removes the unused variable
// bundle.js (part of)
(function(n,e){"use strict";e.b=r;var r=function(){return"Rendered!"}})

This works even with libraries; the library should also be written with ECMAScript modules.

Pitfall: tree-shaking doesn’t work without UglifyJS#

The less-known fact is that the unused code is removed not by webpack, but by UglifyJS. Webpack just removes export statements for the exports that aren’t used, which makes them possible to be removed by a minifier. Therefore, if you compile your bundle without the minifier, the bundle won’t get smaller.

See how to enable UglifyJS in the “Minification” section.

Pitfall: don’t transpile ECMAScript imports to the CommonJS format#

If you use Babel with babel-preset-env or babel-preset-es2015, check the settings of these presets. By default, they transpile ECMAScript’s import and export to CommonJS’ require and module.exports. Pass the { modules: false } option to disable this:

// webpack.config.js
module.exports = {
  module: {
    rules: [
      {
        test: /\.js$/,
        use: [{'babel-loader', options: {
          presets: [['es2015', { modules: false }]]
        }]
      }
    ]
  }
};

Pitfall: complex cases aren’t optimized#

In some complex cases – e. g. when you re-export something (export * from 'file.js'), or when you compile classes with the TypeScript compiler – webpack can’t optimize your bundle. The bad things about this are that the cases when this happens aren’t obvious, and it’s unclear when this will be fixed. Here’s the corresponding GitHub issue: webpack/webpack#2867

Webpack team is working on a solution for re-exports though.

Moment.js#

Tested with moment.js 2.18.1

Moment.js is a library for working with dates. By default, when you include it in your app, it takes 217 kB of minified code. That’s huge – the average size of JavaScript on a page was 417 kB in April 2017. The good part, however, is that it can be easily reduced.

165 kB of the size of moment.js is localization files. They’re included even if you don’t use them. This happens because moment.js chooses the localization files dynamically, during runtime:

Webpack doesn’t know which files you’ll need, so it includes all files from the locale directory.

To deal with it, specify the exact files with MomentLocalesPlugin:

// webpack.config.js
const MomentLocalesPlugin = require('moment-locales-webpack-plugin');

module.exports = {
  plugins: [
    // Or: To strip all locales except “en”, “es-us” and “ru”
    // (“en” is built into Moment and can’t be removed)
    new MomentLocalesPlugin({
      localesToKeep: ['es-us', 'ru'],
    }),
  ],
};

Lodash#

Lodash is a collection of JavaScript utilities.

Tested with Lodash 4.17.4

When you include Lodash, your bundle grows by 72 KB of minified code. That’s the size of all the 316 Lodash methods. If you use only, like, 20 of them, then approximately 65 KB of the code do just nothing except slowing down the page loading.

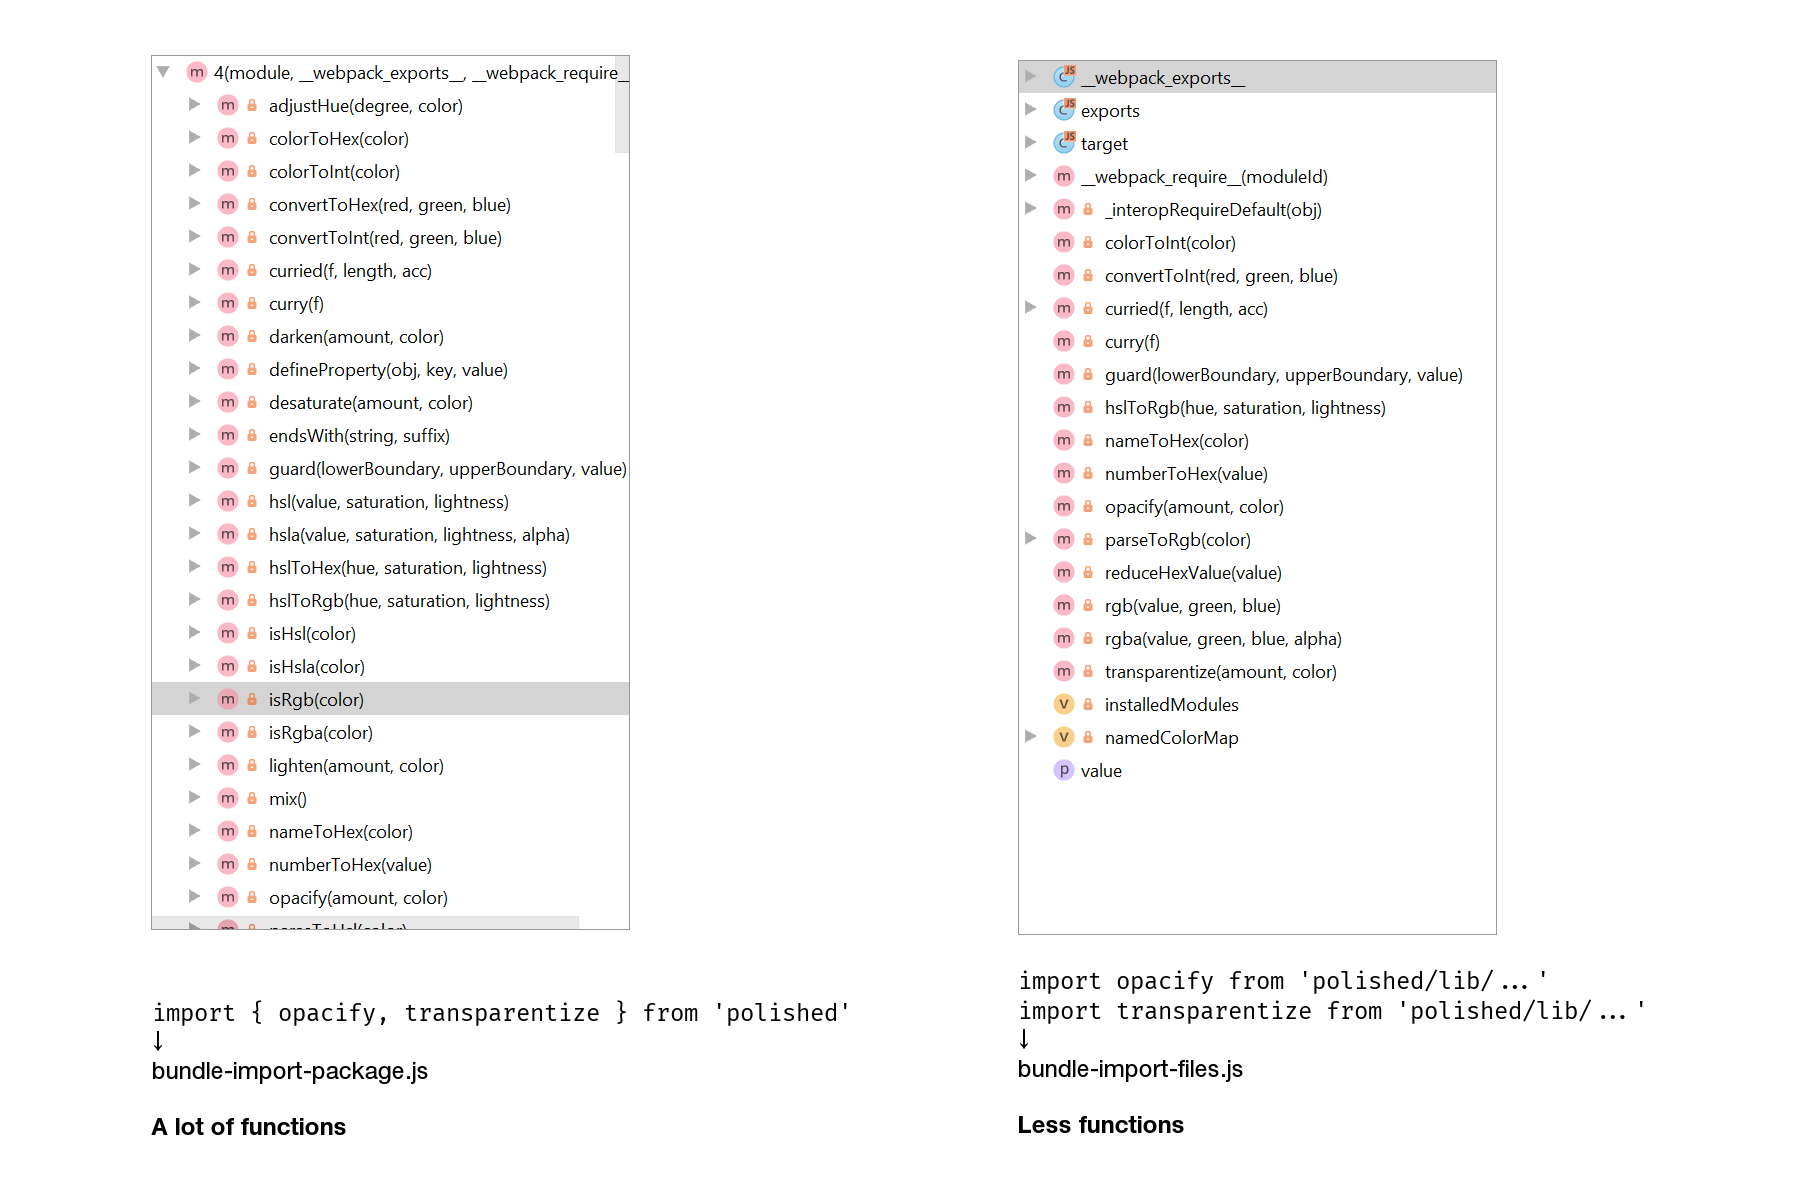
Thankfully, Lodash lets you include only the methods you need. The most basic way to do this is to import methods from the files they’re implemented in:

72 KB → 8.27 KB
- import _ from 'lodash';
- _.get();
+ import get from 'lodash/get';
+ get();

This approach might work if you’re starting a project from scratch, but it doesn’t work for existing projects. What you’re gonna do, rewrite all imports? That’s too much work. That’s why I prefer using babel-plugin-lodash and sometimes lodash-webpack-plugin.

babel-plugin-lodash is a plugin for Babel that replaces generic imports with concrete ones during compilation. That is, it does exactly the same thing as depicted in the snippet above:

72 KB → 8.27 KB
// Before babel-plugin-lodash
import _ from 'lodash';
_.get({ a: { b: 5 } }, 'a.b');

↓

// After babel-plugin-lodash
import _get from 'lodash/get';
_get({ a: { b: 5 } }, 'a.b');

lodash-webpack-plugin is a plugin for webpack that modifies Lodash behavior by removing some code and thus cutting the bundle size. For example, _.get by default supports deep paths. If you don’t need this, you can enable lodash-webpack-plugin, which will remove this support:

72 KB → 772 B
// Before babel-plugin-lodash + lodash-webpack-plugin
import _ from 'lodash';
_.get({ a: { b: 5 } }, 'a.b');
// → returns 5

↓

// After babel-plugin-lodash + lodash-webpack-plugin
import _get from 'lodash/get';
_get({ a: { b: 5 } }, 'a.b');
// → returns undefined

Keep in mind, however, that you can’t just enable the plugin and leave it as-is. This plugin changes the Lodash functionality, so your existing code could break. Take a look at the list of features it removes by default.

Pitfall: duplicated Lodash#

There’re two common versions of Lodash: the lodash package and the lodash-es package (which is Lodash with ES exports). If you use the former package, and one of your dependencies uses the latter, you will find yourself having two Lodashes in a single bundle. To avoid this, alias lodash to lodash-es (or vice versa).

An example of a package that uses lodash-es is Redux.

Thanks to Valentin Semirulnik for this tip.
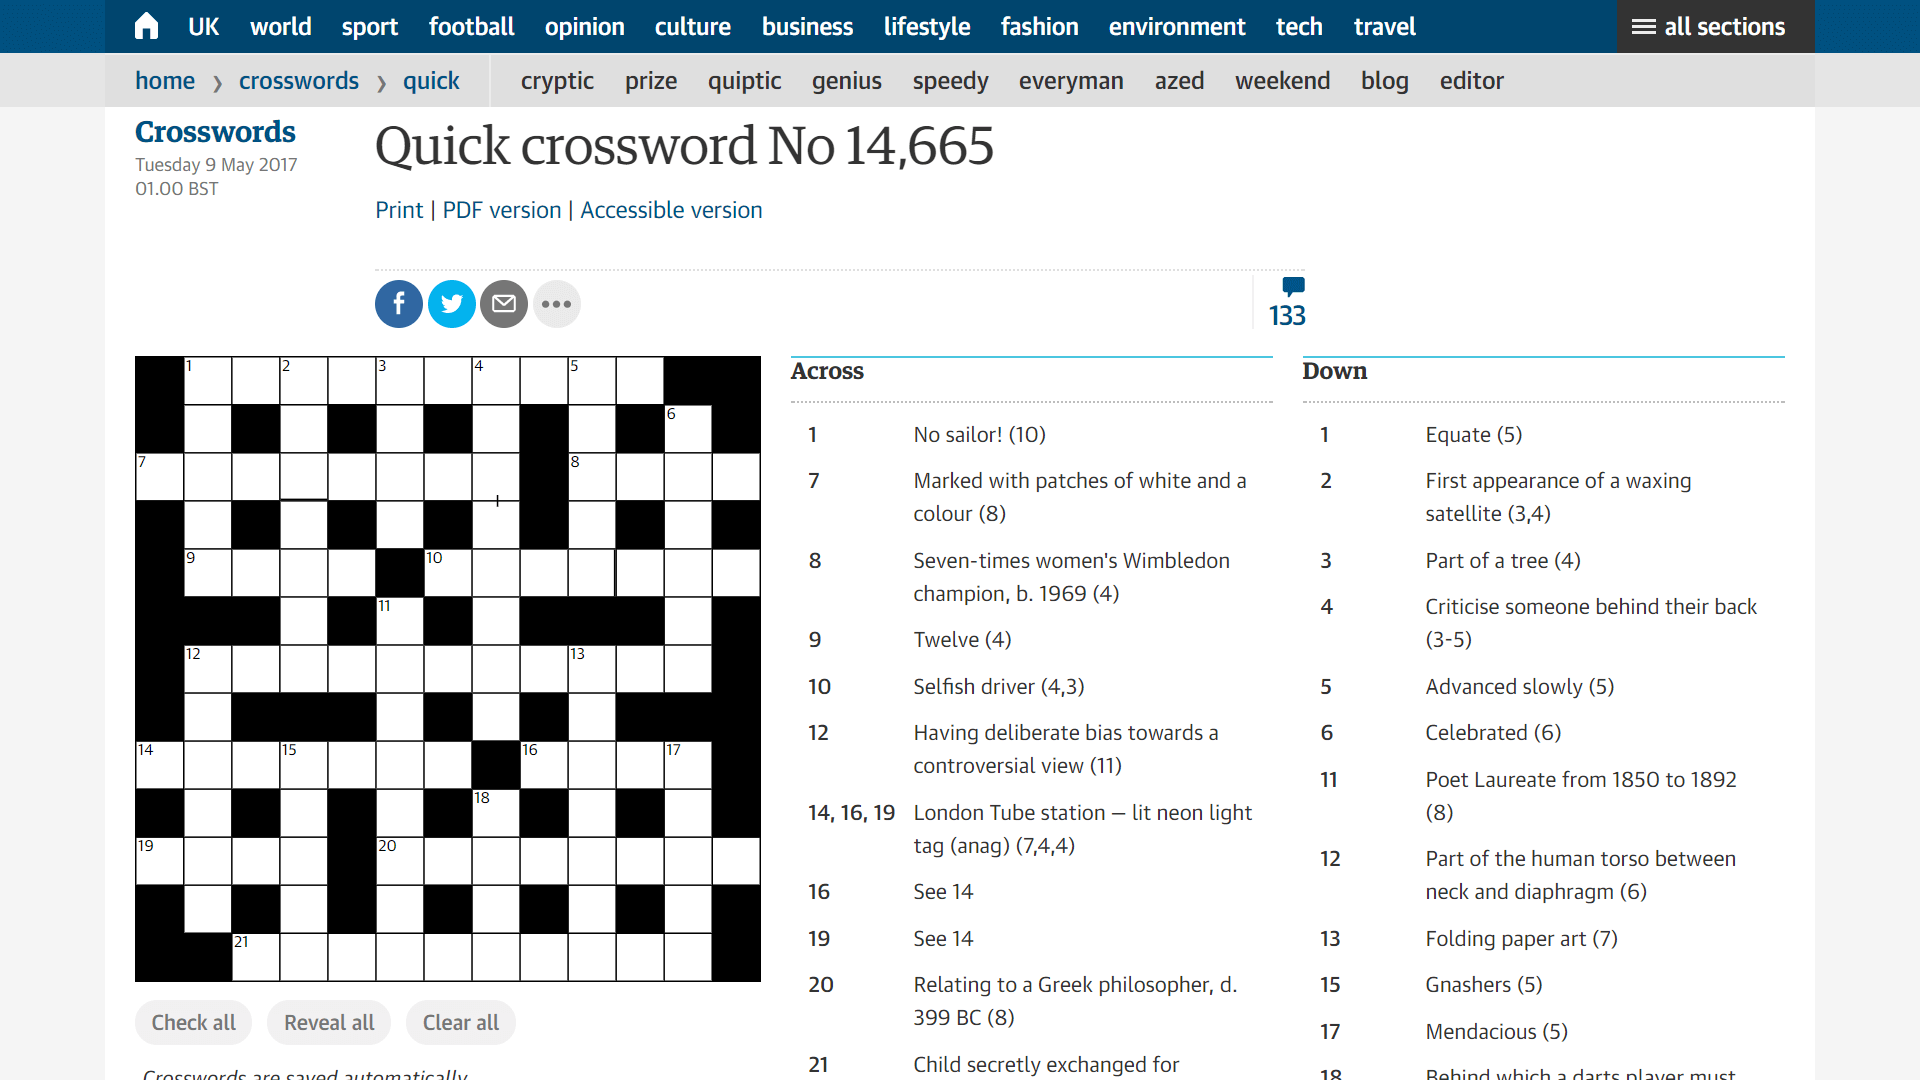
externals#

Sometimes you have a large project where some code is compiled with webpack and some code is not. Like a page with crosswords, where the crosswords module is built with webpack, and the site around it is not:

If both pieces of code have common dependencies, you can share the dependencies between them. This is done with the webpack’s externals option which lets you alias module imports to something different.

The common usage is when you have an instance of a library in the global object (like window), and you want to alias the library imports to this instance. In this case, you pass an object mapping the module names to the variable names:

// webpack.config.js
module.exports = {
  externals: {
    'react': 'React',
    'react-dom': 'ReactDOM',
  }
};

Webpack will replace all module references with variable references.

A less known approach is when the old code doesn’t put the libraries into the global object but loads them with an AMD-compatible loader. In this case, you can compile your webpack as an AMD bundle and alias modules to paths to the libraries:

// webpack.config.js
module.exports = {
  output: { libraryTarget: 'amd' },

  externals: {
    'react': { amd: '/libraries/react.min.js' },
    'react-dom': { amd: '/libraries/react-dom.min.js' },
  }
};

Webpack will wrap your bundle into define() and make it depend on the libraries from externals:

// bundle.js
define(["/libraries/react.min.js", "/libraries/react-dom.min.js"], function () { … });

Then, the loader will load your libraries along with the bundle. The good thing here is that the libraries will be cached in the browser or in the loader cache – so they won’t be loaded twice.

Σ: Decrease front-end size#

  • Configure minification
  • Pass NODE_ENV=production to the code
  • Use ECMAScript imports and exports
  • Drop unused locales in Moment.js
  • Drop unused methods in Lodash
  • Use externals if you have common libraries

Task Improve caching#

Given: you have a front-end application. You want to cache it better so that the visitor loads it faster and doesn’t re-download the whole app when it’s updated.

Using hash#

The default approach of doing caching is to tell the browser cache a file for a very long time (e.g. a year), and rename the file when changing it to force browser to re-download it:

<!-- Before the change -->
<script src="./index.js?version=15">

<!-- After the change -->
<script src="./index.js?version=16">

Webpack also lets you do such thing. However, instead of versioning a file, it calculates the file hash which you can specify in the bundle name. In this case, each time you change the code, the file name will change, and the browser will re-download it:

// webpack.config.js
module.exports = {
  entry: './index.js',
  output: {
    filename: 'bundle.[chunkhash].js'
       // → bundle.8e0d62a03.js
  }
};

The only remaining problem is how to get the file name to send it to the client. There are two solutions: HtmlWebpackPlugin and WebpackManifestPlugin.

HtmlWebpackPlugin is a more automated solution. During compilation, it generates an HTML file which includes all compiled resources. If your server logic is simple, then this plugin should be enough for you:

<!-- index.html -->
<!doctype html>
<!-- ... -->
<script src="bundle.8e0d62a03.js"></script>

WebpackManifestPlugin is a more flexible solution which is useful if you have a complex server part. It generates a JSON file with a mapping between file names without hash and file names with hash. You can use this JSON on your server:

{
  "bundle.js": "bundle.8e0d62a03.js"
}

Pitfall: hash could change even if the bundle is the same#

The hash could change if you rename a file or compile the bundle under a different OS. This is a bug, and I was unable to find a workaround. You can see the discussion about the bug on GitHub.

Update: the previous version of this part recommended using webpack-chunk-hash as a solution. Turns out, it doesn’t help.

Code splitting#

The next way to improve caching is to split the bundle into smaller pieces.

Imagine you have a large website, and you’re compiling it into a single bundle:

Each time you’re changing a single module, the whole bundle gets recompiled. This means that even if you’re changing the comments module, and a specific user is only visiting the main page, they’ll still have to re-download the code for this page.

If you split your bundle into several pieces – one for the main page and one for the article page – the user will only have to re-download the changed piece of code. Webpack lets you do this. In webpack terminology, these pieces of the bundle are called chunks.

To split the code into chunks, you specify several entry points and do a few other changes. Here’s the optimal webpack config:

You specify multiple entry points, and webpack generates a separate chunk for each point. Each chunk will only include the dependencies it needs
module.exports = {
  entry: {
    homepage: './index.js',
    article: './article.js'
  },
  output: {
You replace a fixed filename with [name]. [name] will correspond to the entry point name
    filename: '[name].[chunkhash].js'
  },
  plugins: [
You add WebpackManifestPlugin and WebpackChunkHash – plugins from the previous section
    new WebpackManifestPlugin(),
    new WebpackChunkHash(),

You add two CommonsChunkPlugins. They let you move some code from existing chunks to new commons chunks.

The first plugin moves all node_modules dependencies to a separate chunk. This allows you update the code without invalidating dependencies.

The second plugin moves webpack’s runtime to a separate chunk. This allows you to update runtime without invalidating other code. Runtime is a webpack’s system code that is responsible for loading the app

    new webpack.optimize.CommonsChunkPlugin({
      name: 'vendor',
      minChunks: m => m.context &&
        m.context.includes('node_modules'),
    }),
    new webpack.optimize.CommonsChunkPlugin({
      name: 'runtime',
      minChunks: Infinity,
    }),
You add ashedModuleIdsPlugin. By default, each module in webpack has an ID which corresponds to its order. If you add a new module, it can affect other module ids and invalidate the cached chunks. This plugin replaces order-based IDs with hash-based ones
    new webpack.HashedModuleIdsPlugin(),

You add ChunkManifestPlugin.

By default, the webpack’s runtime contains a mapping between IDs of chunks and their names. If you configure the file name to contain the hash, as we did with the filename option, the hash will change with each file change, and so will the runtime.

ChunkManifestPlugin lets you extract this mapping into a separate JSON file. On the server, you’ll need to inline this file into the global webpackManifest variable

    new ChunkManifestPlugin({
      filename: 'chunk-manifest.json',
      manifestVariable: 'webpackManifest'
    })
  ]
};

With this config, webpack will generate 6 files:

Two separate entry points. Each should be loaded on the corresponding pages
homepage.a68cd93e1a43281ecaf0.js
article.d07a1a5e55dbd86d572b.js
File with vendor dependencies and file with webpack runtime
vendor.1ebfd76d9dbc95deaed0.js
runtime.d41d8cd98f00b204e980.js
Two manifest files that you’ll need on the server
manifest.json
chunk-manifest.json

And this is how often they’ll change:

  • homepage and article – when the app code in these modules changes,
  • vendor – when any dependencies of the app change,
  • runtime – when webpack’s runtime code changes (i.e. rarely and only with new webpack versions),
  • manifest.json – when you add a new chunk – but that doesn’t matter because this file is used in the server,
  • chunk-manifest.json – on any code change – but that doesn’t matter because this file is used in the server.

That’s a bit more files, but it lets you effectively leverage long-term caching.

On-demand code splitting#

The next way to improve caching (and optimize time to first paint) is to load some parts of code on demand.

Imagine you have a page with an article:

When opening this page, the visitor wants to see the content at first. Comments, sidebar and other parts of the page are less relevant to them. However, if you bundle all these blocks into a single file, the visitor will have to wait until the whole file is downloaded – with all the page modules. This isn’t cool.

Thankfully, webpack lets you optimize this by loading code on demand. You can specify that you want to load specific modules dynamically, and webpack will move them to separate chunks and download when they’re required. This is how it works:

You have an article-page.js file. When you compile it, the bundle receives all the code for articles, comments and sidebar
// article-page.js
import { renderArticle } from './components/article';
import { renderComments } from './components/comments';
import { renderSidebar } from './components/sidebar';

renderArticle();
renderComments();
renderSidebar();

To load code on demand, you replace static import with dynamic import() calls. Webpack will move the code from ./comments.js and ./sidebar.js into separate chunks and load them when they’re required
// article-page.js
import { renderArticle } from './components/article';
renderArticle();

import('./comments.js')
  .then((module) => { module.renderComments(); });
import('./sidebar.js')
  .then((module) => { module.renderSidebar(); });

This change will improve the initial loading performance. Also, it will optimize caching because when you change the code that belongs to a specific chunk, other chunks won’t get affected.

The only thing left is to add chunk hashes to their names. This is done with output.chunkFilename option. This option is specific to chunks generated by on-demand code splitting:

// webpack.config.js
module.exports = {
  output: {
    filename: '[name].[chunkhash].js',
    chunkFilename: '[name].[chunkhash].js',
  }
};

Pitfall: Compiling with Babel#

If you compile this code with Babel with default presets, you’ll have a syntax error: Babel don’t understand import() out of the box. To prevent the error, add the syntax-dynamic-import plugin.

Other solutions#

There are a couple of other solutions that I haven’t worked with but which should also bring benefits with caching:

  • AggressiveSplittingPlugin is a plugin that optimizes your code for HTTP/2 by splitting each chunk into smaller chunks as much as possible. This greatly improves caching on the client side but slightly worsens the gzip compression. See the example in the webpack repository.
  • OfflinePlugin is a plugin that’s usually used for creating offline-ready apps. However, you can use it to improve caching too! The plugin generates a service worker that downloads all the site resources in the background. So when a visitor visits the site and then switches to a different page, they’ll have all the necessary files already cached. See the OfflinePlugin docs.

Σ: Improve caching#

  • Add hash to the name of your resources and make the server tell clients to cache the resources for a long time
  • Split your code into smaller chunks with different entries, on-demand code splitting and AggressiveSplittingPlugin
  • Try caching your resources in the background with OfflinePlugin

The next part of the guide, “Speeding up build and improving the development workflow”, is coming soon. Leave your email to know when it’s out:
(you’ll receive an email about the next part of the guide + a couple of more webpack-related posts if I write them; no spam)

How webpack’s ContextReplacementPlugin works

It took me quite a long time of using ContextReplacementPlugin to finally realize what it really does. I hope this post will save you from that.

Once in a while, you need to write a dynamic import. A dynamic import is when an imported file is only known at runtime:

require('./inputs/' + inputType + '/index.js');

When you’re bundling this with webpack, webpack can’t know what exact file you’ll need. To make the application work, webpack will find and import all index.js files in all subdirectories of the inputs directory, recursively. This can significantly increase your bundle size.

ContextReplacementPlugin lets you change how webpack deals with dynamic imports. In this case, you can use it to narrow the search scope and thus cut the bundle size.

Here’s an example:

ContextReplacementPlugin is often used with moment.js, a library for working with dates. The thing with moment.js is that it has a bunch of locales, and it imports them dynamically on runtime:

// moment.js
require('./locale/' + name + '.js');

To make this work, webpack imports all the locales it can find – which adds 330 kB of non-minified code.

In most cases, you only need to support a few locales and don’t need all the other ones. ContextReplacementPlugin lets you specify the specific locales that webpack should import:

// webpack.config.js
const webpack = require('webpack');

module.exports = {
  plugins: [
    new webpack.ContextReplacementPlugin(
      /moment[/\]locale/,
      // Regular expression to match the files
      // that should be imported
      /(en-gb|ru).js/
    )
  ]
};

That works, that’s copy-pasteable, but that’s cryptic. Let’s see what all these parameters really mean.

Context and how to replace it#

Each time you compile a dynamic import like this:

require('./locale/' + name + '.js');

webpack collects three pieces of information:

  • in what directory the files are located (in this case, it’s ./locale),
  • what regular expression should a file match to be imported (in this case, it’s /^.*.js$/),
  • and if webpack should look for the files in the subdirectories (recursive flag; always true by default).

These three pieces of information are called context.

Then, webpack searches the appropriate files using the context. That means it looks into the directory specified in the context, looks into its subdirectories if the flag from the context is true, and uses the regular expression from the context to match and import the files.

Now, the key point. ContextReplacementPlugin lets you replace the context that webpack uses for search – e.g. override the directory in which webpack should look for the files or the regular expression that webpack should use to match the files.

For example, with the moment.js example from above, ContextReplacementPlugin replaces the original regular expression /^.*.js$/ with another expression we pass – /(en-gb|ru).js/. This way, we import only the necessary locales.

To replace the context, you pass the parts you want to replace as the last parameters of ContextReplacementPlugin:

new webpack.ContextReplacementPlugin(
  // The criterion to search; we’ll get to it in a moment
  searchCritetion: RegExp,
  // The new directory to look for the files
  [newDirectory]: String,
  // The new recursive flag. True by default.
  // Pass false to disable recursive lookup
  [newRecursiveFlag]: Boolean,
  // The new regular expression to match
  // and import the files
  [newFilesRegExp]: RegExp
)

Examples#

If you don’t fully understand how webpack generates context, here’re examples:

Finding the original context to replace#

So, you’ve got a case when you have a dynamic import, and you need to replace its context with another one. How do you find this import and pass it to the plugin? You search by the context that the import generates.

ContextReplacementPlugin allows you to search by the context’s directory. This means that if you want to find an import, you should calculate what context it creates, and then pass a regular expression matching that directory to the context. That sounds complex, so let’s just see how it works:

You have an import like this:

require('./locale/' + name + '.js')

and you want to apply ContextReplacementPlugin to it to limit the number of the included files.

Step 1. Calculate the context that will be created by the import
With this import, the context has three parts:

  • directory, which is ./locale,
  • the regular expression to match the files, which is /^.*.js$/.
  • and the recursive flag (always true).

Step 2. Extract the directory from the context
Here, the directory from the original context is //./locale//.

Step 3. Find the full absolute path of the directory
On your machine, the full path of the directory could be something like '/usr/…/my-project/node_modules/moment/locale'.

Step 4. Create a regular expression that matches the path
This could be as simple as /locale/. Or this could be something more specific, like /moment[/\]locale/ (cross-platform version of /moment/locale/).

I recommend to be as specific as possible: a simple regular expression, like /locale/, can unexpectedly match other imports, like require('./images/flags/locale/' + localeName).

Step 5. Pass the regular expression as the first parameter of ContextReplacementPlugin
Like this:

new webpack.ContextReplacementPlugin(
  /moment[/\]locale/,
  …
)

NormalModuleReplacementPlugin#

Note: ContextReplacementPlugin works only with dynamic imports. If you ever want to configure a redirect for a normal, non-dynamic import, use NormalModuleReplacementPlugin. It works with static imports (only with them), and it’s way simpler to understand.

Bonus point: webpack 2#

The traditional usage of ContextReplacementPlugin is to replace one context with another context. However, webpack 2 brought a new API that you can use to granularly redirect imports:

new ContextReplacementPlugin(
  /moment[/\]locale/,
  path.resolve(__dirname, 'src'),
  {
    './en.js': './dir1/en.js',
    './ru.js': './dir2/ru.js',
  }
)

The code above:

  • will add two files, ./src/dir1/en.js and ./src/dir2/ru.js, to the bundle,
  • will redirect all runtime requests from node_modules/moment/locale/en.js to dir1/en.js,
  • will redirect all runtime requests from node_modules/moment/locale/ru.js to dir2/ru.js.

This is something that can’t be achieved with traditional ContextReplacementPlugin. Unfortunately, this API is only briefly mentioned in a GitHub issue.

When is this helpful? I can only think of some cases when a large existing project is being migrated to webpack – but I haven’t seen any practical example. If you know any, share them in the comments!

Here’s how you write your own redirection:

new ContextReplacementPlugin(
  // Specify the criterion for search
  /moment[/\]locale/,
  
  // Specify any directory that’s common
  // for all the redirection targets.
  // It can’t be __dirname: for some reason,
  // that doesn’t work
  path.resolve(__dirname, 'src'),
  
  // Specify the mapping in form of
  // { runtime request : compile-time request }
  // IMPORTANT: runtime request should exactly match
  // the text that is passed into `require()`
  // IMPORTANT: compile-time request should be relative
  // to the directory from the previous parameter
  {
    './en.js': './dir1/en.js',
    './ru.js': './dir2/ru.js',
  }
)

Σ#

The key points:

  • Each time you do a dynamic import, webpack creates a context. Context is an object containing the directory to look into, the recursive flag and the regular expression for matching files.

  • Use ContextReplacementPlugin to change how webpack handles dynamic imports. This can be helpful when you need to decrease the bundle size or migrate some complex code to webpack.

  • You can granularly redirect compile-time requests to the different files with webpack 2.

Further reading#

Here’re some related links:


This is an article in my series of articles about webpack. The next one, “Speeding up build and improving the development workflow”, is coming in July. Leave your email to know when it’s out:
(you’ll receive an email about this post + a couple of more webpack-related posts if I write them; no spam)